Integerate all iptvs from network
iptv source
https://github.com/imDazui/Tvlist-awesome-m3u-m3u8
https://github.com/EvilCult/iptv-m3u-maker
iptv software
kodi
vlc
https://github.com/imDazui/Tvlist-awesome-m3u-m3u8
https://github.com/EvilCult/iptv-m3u-maker
kodi
vlc
some variants of 8641 soc
8641 one e600 core
8641d two e600 core
two seperate ddr sdram controller
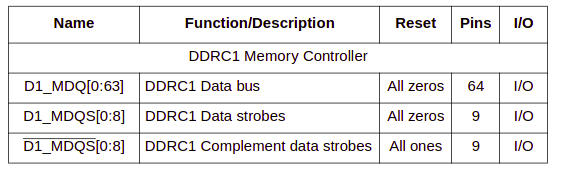
DQ为ddr数据信号,DQS为ddr数据信号的”时钟”
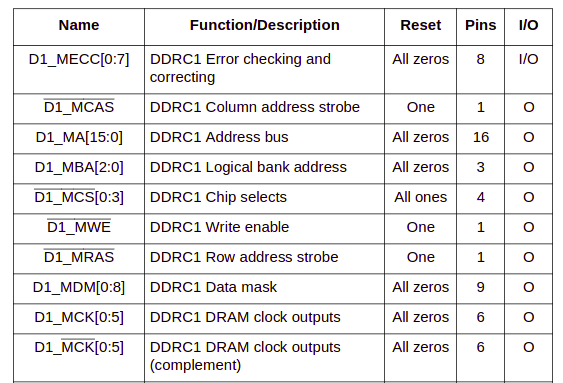
MA为地址信号,BA为bank地址信号,CAS/RAS为地址信号的”时钟”,CS为片选,CK为差分时钟信号。该ddr控制器总共4根片选,可以接4片ddr内存。DM为数据mask信号,对于x16接口,高低字节都需要一个DM信号。
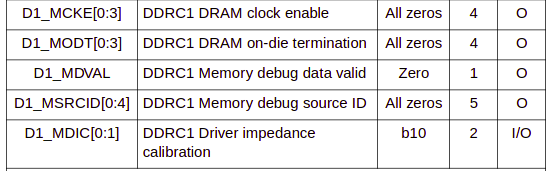
CKE为时钟使能信号,ODT为终端电阻控制信号。
信号总共分为几类
data bus
data clock
address bus
address clock
control&debug
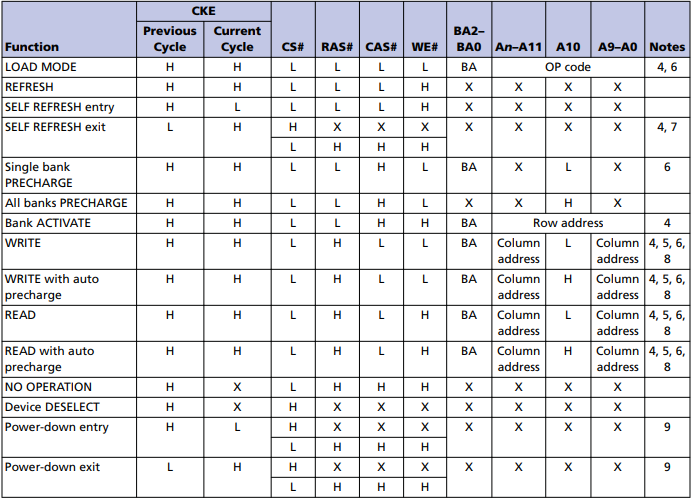
timing参数设置是由ddr控制器通过JEDEC标准定义的命令经过内存访问时序发给内存芯片的。ddr控制器和ddr芯片间通过jedec命令交互。试想一下如果没有jedec标准,每个内存芯片商按照自己的标准生产芯片,对于ddr controller厂商的实现将不会通用,必然导致增加研发成本,所以说标准化是一个很厉害的东西,尤其是各行业的标准都是技术大厂主导的。
对于BSP来讲,对ddr芯片参数的设置就转换成对ddr controller的参数进行设置。一般SOC都会以内存映射的方式映射ddr controller的控制寄存器到系统空间,这样CPU就可以配置这些参数了。
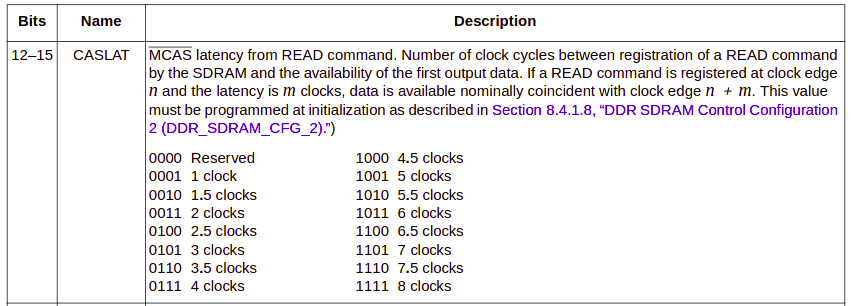
CAS Latency是指内存存取数据所需的延迟时间,简单就是内存接到CPU的指令后的反应速度。
CAS Latency是指列地址选通脉冲时间延迟,控制着从收到命令到执行命令的间隔时间。
从CAS开始到CAS结束的时间就是现在讲的CAS延迟。CAS是内存寻址的最后一个步骤,在内存参数中最重要。
CL is short for CAS Latency.
CL数字越小,代表反应需要的时间越短。
1 | drivers/ddr/fsl/mpc86xx_ddr.c |
两个ddr控制器
fsl_ddr_set_memctl_regs
根据手册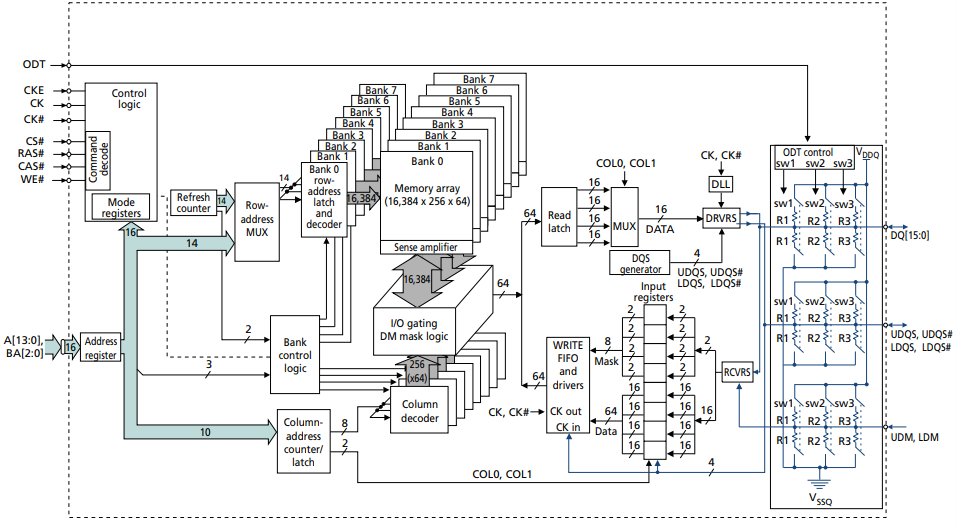
行地址14位,列地址10位,bank地址3位
总共16384256648 bits
行 列 数据 bank数
=> 32M64 = 2G bytes
每个ddr控制器总共4个片选信号,总共可以连接4片
目前连接一片ddr,根据硬件连接确定片选信号线。
所有上面的信息需要配置给ddr芯片,配置到ddr芯片是通过ddr控制器的寄存器操作完成的。
相关的寄存器设置见uboot代码
sbc8641d类似配置
1 | include/configs/sbc8641d |
CONFIG_SYS_DDR_TIMING_1中12-15位配置CL参数可以按需修改。
1、8641d芯片手册
2、内存芯片手册
3、uboot源码
vs code作为一个编辑器,提供不错的外观和出色的性能,大量的扩展插件使其成为出色的IDE。
首先使用c/c++扩展写个测试代码。
1 | c_cpp_properties.json |
上面把boost配置includepath,这样vs code可以智能的完成代码补全和代码提示,非常高效。
1 | tasks.json |
上面我们添加boost头文件,或者lib文件,可以方便的生成可执行文件。
1 | launch.json |
上面文件我们调试这个可执行文件的配置。
综上c/c++插件可以满足单个c++源文件的构建,在写测试代码时非常方便,但是多个文件的情况难以胜任。
1 | CMakeLists.txt |
该扩展可以帮助生成基本的cmake配置文件,在此基础上可配置多个文件的编译生成。
1 | #include <iostream> |
八皇后问题续
先上运行结果
上篇文章已经完成八皇后问题的求解,这里我们增加图形界面把结果绘制出来。
这里图形界面采用GTK实现,使用GTK+glade3完成,使用glade3设计图形界面。
代码下载
这篇文章简单分析了u-boot从汇编代码到执行加载内核的整个过程,细节参考代码。
1 | su@ubuntu2004:/sdb1/u-boot-2020.10$ cat u-boot.lds |
u-boot链接脚本,u-boot入口为_start。
1 | /* |
中断向量表,如复位中断、为定义指令、数据中断、快中断、正常中断等等。
上电复位后执行复位中断。
1 | /************************************************************************* |
从复位中断处理函数开始执行,首先关中断,禁止mmu,cache,准备c执行环境。
1 | /* |
主要执行board_init_f函数, 重定位u-boot。
1 | /* |
驱动等的初始化。
1 | /* We come here after U-Boot is initialised and ready to process commands */ |
进入main_loop,命令行初始化,准备执行u-boot命令。
1 | const char *bootdelay_process(void) |
获取bootcmd的设置,执行bootcmd的命令。
1、u-boot源码
在棋盘上放置皇后,使得行、列、对角线只能有一个皇后。
Board类表示棋盘,Resolver类表示求解算法。
1 |
|
1 | sudo apt install gcc-arm-linux-gnueabi |
1 | su@ubuntu2004:/sdb1/buildroot-2020.02.8$ dpkg -l | grep armel |
1 | su@ubuntu2004:/sdb1/buildroot-2020.02.8$ dpkg -l linux-libc-dev-armel-cross |
1 | su@ubuntu2004:/sdb1/buildroot-2020.02.8$ dpkg -L libc6-armel-cross |
1 | su@ubuntu2004:/sdb1/buildroot-2020.02.8$ dpkg -L libc6-dev-armel-cross |
GCC provides a low-level library, libgcc.a or libgcc_s.so on some platforms. GCC generates calls to routines in this library automatically, whether it needs to perform some operation that is too compilcated to emit inline cde for.
Most of the routines in libgcc handle arithmetic operations that the target processor cannot perform directly. This includes integer multiply and divide on some machine, and all floating-point and fixed-point operations on other machines. libgcc also includes routines for exception handling, and a handful of miscellaneous operations.
Some of these routines can be defined in mostly machine-independent C. Others must be hand-written in assembly language for each processor that needs them.
Detail info please refer to here.
libatomic - The GNU Atomic library which is a GCC support runtime library for atomic operations not supported by hardware.
1 | export ARCH=arm |
include/configs/vexpress_ca9x4.h
1 |
DEBUG macro controls the debug information in u-boot.
Please undefine it for release version.
Enabling mtd
1 | CONFIG_MTD=y |
It’s not necessary to enable mtd partition support in u-boot.
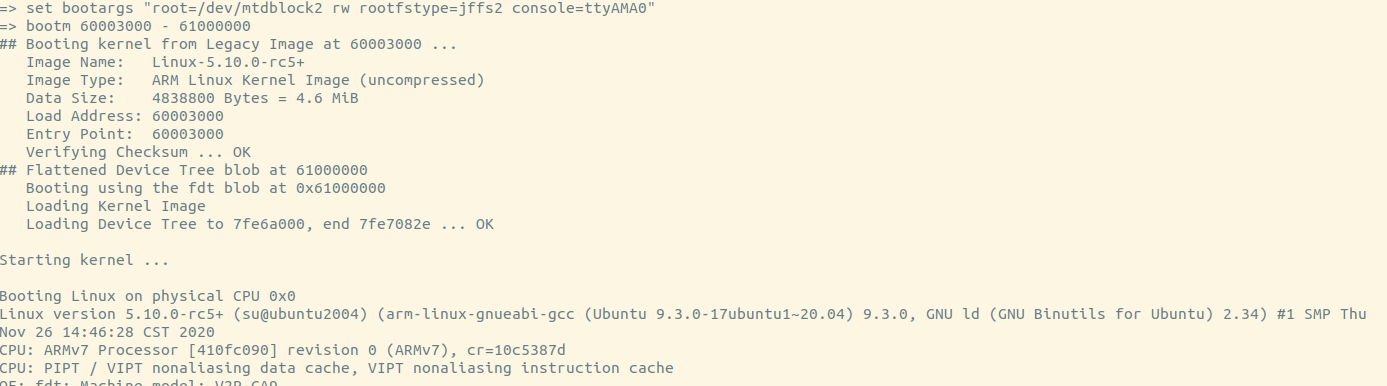
We just pass proper arguments to kernel then kernel can startup!
1 | set bootargs "console=ttyAMA0 root=/dev/mtdblock2 rootfstype=ext3" |
1 | qemu-system-arm -M vexpress-a9 -nographic -m 512M -kernel u-boot |
1 | qemu-system-arm -M vexpress-a9 -nographic -m 512M -kernel u-boot -pflash firmware.bin |
Generating firmware
1 | # create 64M image |
flash image layout
| TITLE | range |
|---|---|
| uImage | 0-7M |
| vexpress-v2p-ca9.dtb | 7-8M |
| rootfs.img | 8-64M |
rootfs.img is a ext3 file system image.
How to build uImage,dtb,rootfs is in the next part.
Running Example:
u-boot will load kernel from flash then start the kernel.
The kernel will mount rootfs with arguments which are passed from u-boot.
Init will be run and system will startup.
1 | export ARCH=arm |
As new kernels are all using dts so we need to moidy dts for partitions.
1 | vim arch/arm/boot/dts/vexpress-v2p-ca9.dts |
1 | vim arch/arm/boot/dts/vexpress-v2m.dtsi |
flash0 here is alias for flash device in dts file.
We modify it using fixed partition mode, not arm-firmware-suite mode which need each partition must contains self footer information at the end of partition.
1 | qemu-system-arm -M vexpress-a9 -m 512M -nographic -kernel zImage -dtb vexpress-v2p-ca9.dtb |
It will hung up with message:
1 | end Kernel panic - not syncing: VFS: Unable to mount root fs on unknown-block(0,0) |
As we havent set rootfs!
As uclibc died, we use uclibc-ng instead.
Refer to document we use command as below.
Installing linux kernel header
Our environment settings:
| kernel source path | /sdb1/linux |
| kernel compile path | /sdb1/vexpress_a9 |
| install header path | /sdb1/linux-headers |
1 | cd /sdb1/linux |
Configuration
1 | make menuconfig |
Settings for our target system:
| TARGET_arm=y |
| TARGET_ARCH=”arm” |
| CONFIG_ARM_EABI=y |
| KERNEL_HEADERS=”/sdb1/linux-headers/include” |
Building uclibc-ng
1 | make CROSS_COMPILE=arm-linux-gnueabi- O=/sdb1/out-uclibc-ng |
Note O= must be absolute path.
Installation
1 | make O=/sdb1/out-uclibc-ng PREFIX=/sdb1/uclibc-ng-install install |
After the installation, everything is as below here:
Everything under arm-linux-uclibc/lib/* we need put them in our target rootfs.
usr/* is for building and linking our application which is used by cross-compiler.
On ubuntu 20.04, the arm cross-toolchain using apt is gcc9.3 with glibc 2.31 and kernel header version is 5.4.21.
So if we want to use uclibc-ng we may need compile gcc ourselves.
1 | ../uclibc-ng-install/ |
usr/include/* and usr/lib/* are for compiler to link with.
lib/* are the runtime shared libraries for applications.
1 | export ARCH=arm |
Or default building mode is shared, so we need copy all shared libraries to system rootfs.
cp /usr/arm-linux-gnueabi/lib/.so. rootfs/lib -arf
If we want to use arm-linux-gnueabi toolchain, the size of libraries is aboud 16M. Maybe we should build our uclibc toolchain.
1 | !/bin/bash |
1 | !/bin/bash |
initramfs vs initrd
The first question : Are they the same thing?
Note from here:
If an initramfs is built into kernel or passed to it, the kernel will try to execute /init in the initramfs. Usually /init is as shell script that will find and mount the root partition, then switch_root onto the root partition and execute /sbin/init.
The initramfs can be built into kernel with CONFIG_INITRAMFS_SOURCE which is the rootfs directory in local file system.
The standalone initramfs is also ok in which case we need tell the bootloader where initramfs is.
Generating initrd
1 | find . | cpio --quiet -H newc -o | gzip -9 -n > myinitrd |
Running kernel with standalone initrd
qemu-system-arm -M vexpress-a9 -m 512M -kernel zImage -initrd initrd.img -dtb vexpress-v2p-ca9.dtb -nographic -append “console=ttyAMA0 rdinit=/linuxrc”
If the initramfs doesnot have /init then kernel panic with message:
Kernel panic - not syncing: VFS: Unable to mount root fs on unknown-block(1,0)
If we really dont want to have such “/init”, we can append the kernel args to workaround it.
rdinit=/linuxrc
1 | qemu-system-arm -M vexpress-a9 -m 512M -nographic -kernel zImage -dtb vexpress-v2p-ca9.dtb -append "root=/dev/mmcblk0 rw console=ttyAMA0" -sd a9rootfs.ext3 |
Here we use the partition at sd card as the rootfs.
We can use installed arm-linux-gnueabi toolchain to build shared or static applications. For “shared” building we need runtime shared libraries(glibc and gcc runtime libraries such as libgcc libatomic) to rootfs.
If we want to use uclibc we need more hacks so we build ourselves toolchain using buildroot.
https://buildroot.org/downloads/buildroot-2020.02.8.tar.gz
1 | make menuconfig |
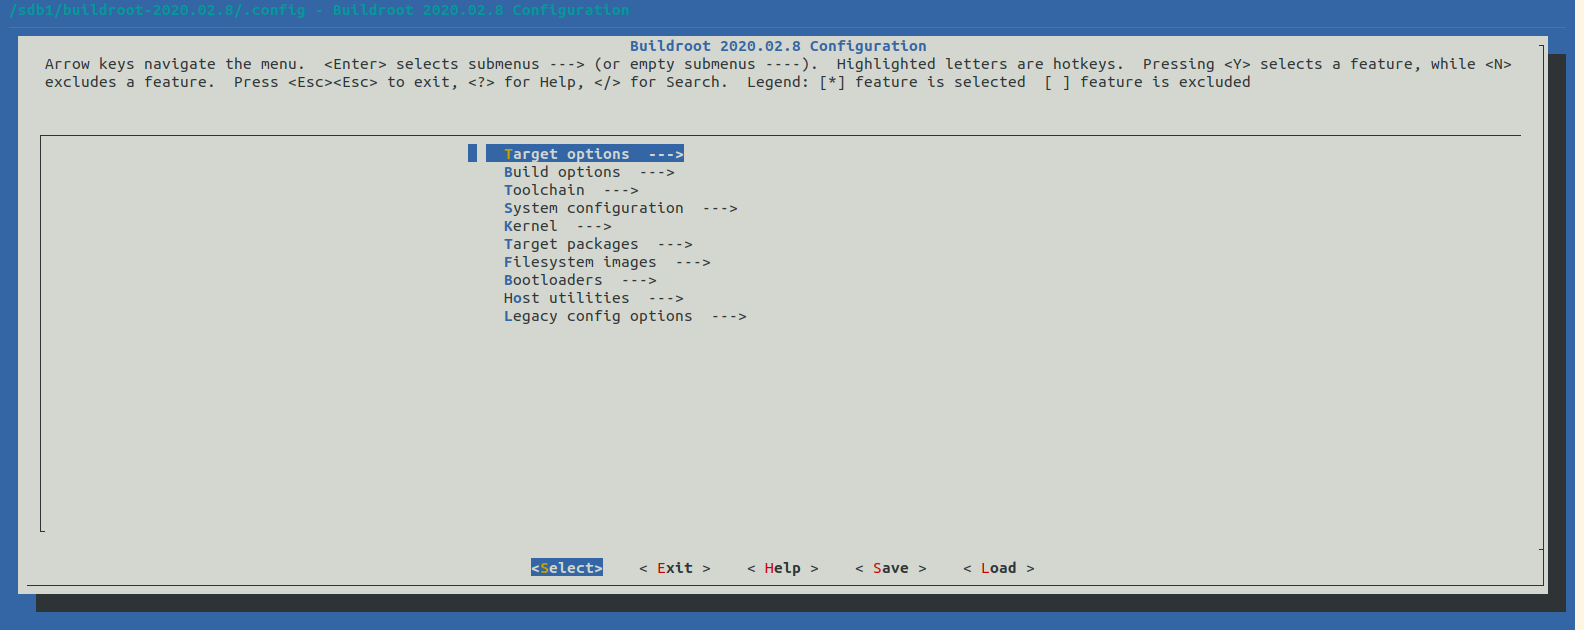
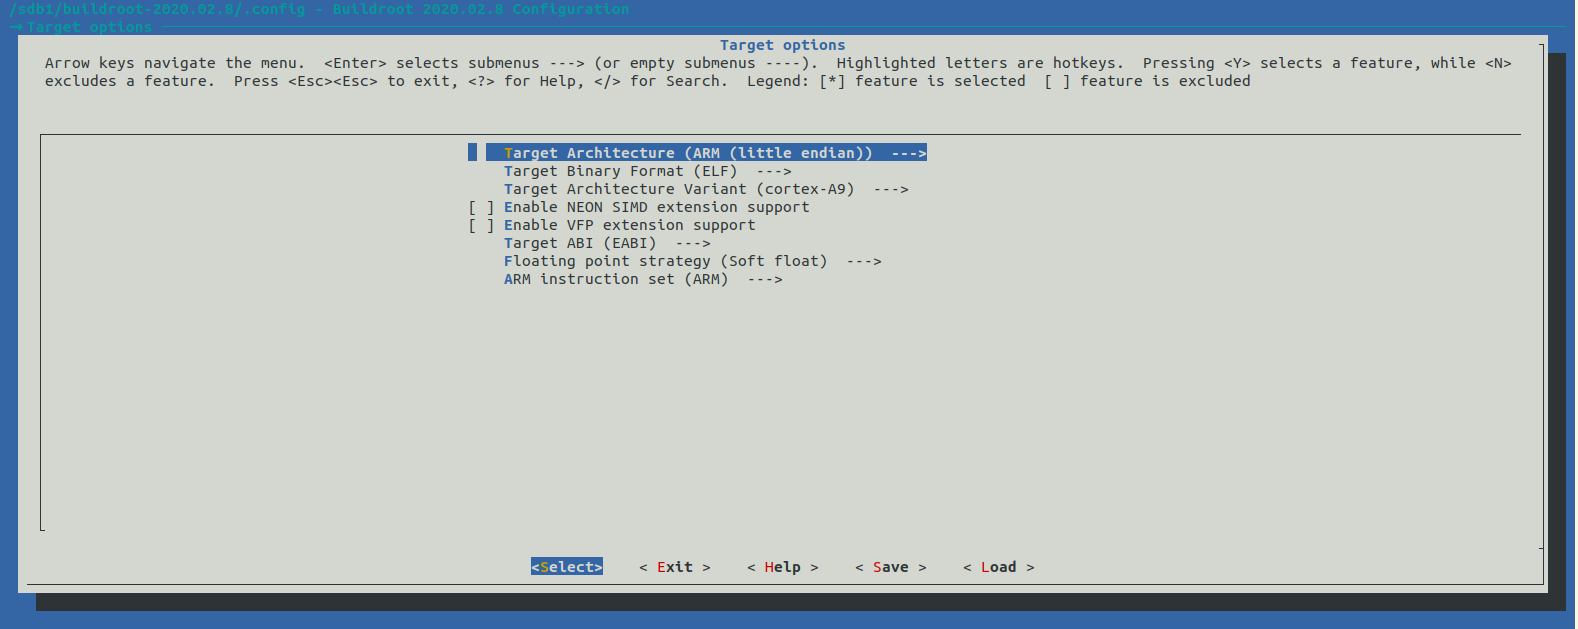
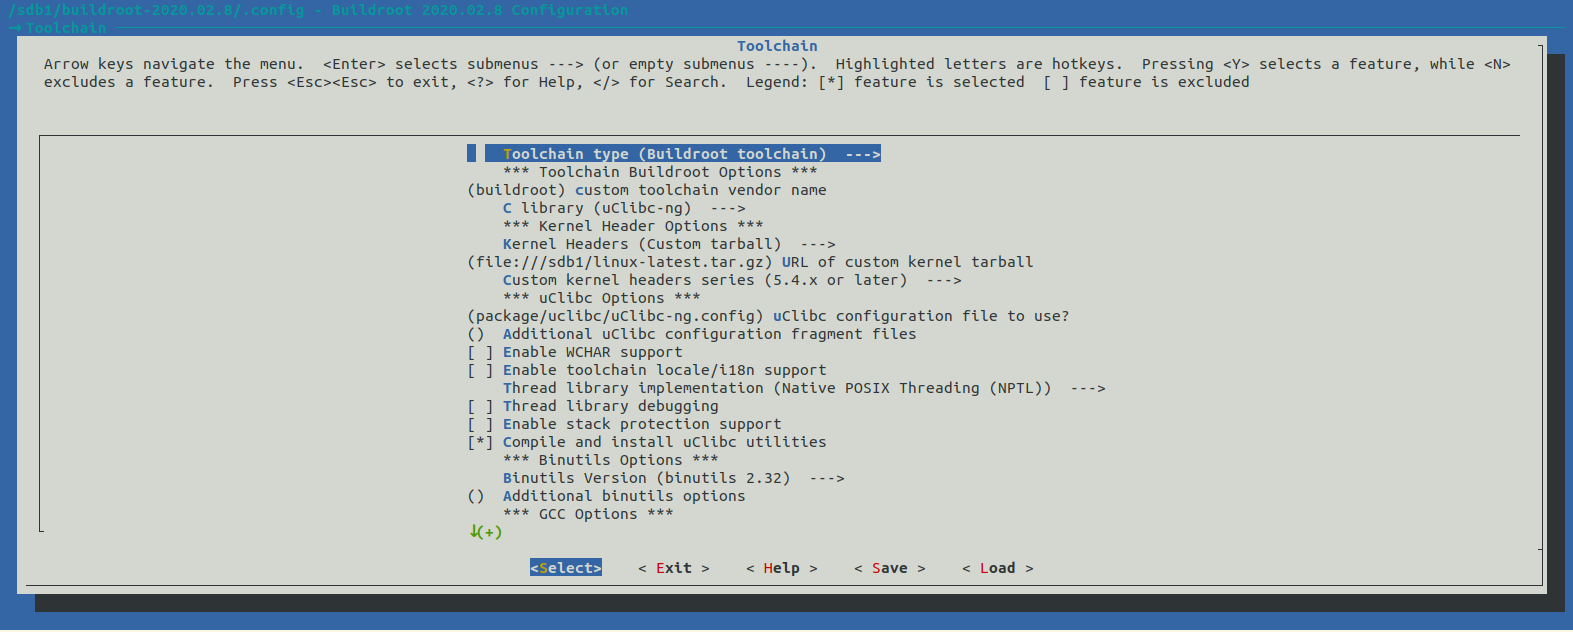
we can set linux kernel headers which the toolchain may use and which lib we use (glibc, uclibc, musl).
1 | su@ubuntu2004:/sdb1/buildroot-2020.02.8$ tree -L 1 |
output/ has all things we need.
1 | su@ubuntu2004:/sdb1/buildroot-2020.02.8$ tree output -L 1 |
host/ is our cross compile toolchain.
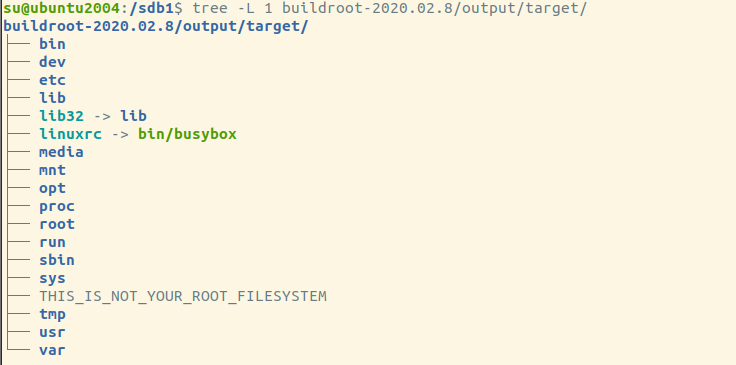
target/ has our rootfs directory which busybox and gcc/uclibc runtime shared libraries are all there.
1 | su@ubuntu2004:/sdb1/buildroot-2020.02.8$ tree output/host/arm-buildroot-linux-uclibcgnueabi/sysroot/ -L 2 |
1 | /sdb1/buildroot-2020.02.8/output/host/bin/arm-buildroot-linux-uclibcgnueabi-gcc hello.c -o hello |
1 | su@ubuntu2004:/sdb1/hello-world$ file hello |
Building a application using our self-building toolchain.
1 | !/bin/bash |
We should create all the needed device files by ourselves!
1 | sudo qemu-system-arm -M vexpress-a9 -m 512M -kernel vexpress_a9/arch/arm/boot/zImage -dtb vexpress_a9/arch/arm/boot/dts/vexpress-v2p-ca9.dtb -nographic -append "root=/dev/mmcblk0 rw console=ttyAMA0" -sd a9rootfs.ext3 |
Running example:
Now we’ve building u-boot, kernel, dtb, rootfs. It’s time for us to custom our firmware.
Defining default u-boot arguments
1 |
|
Generating firmware
1 | !/bin/bash |
Running firmware
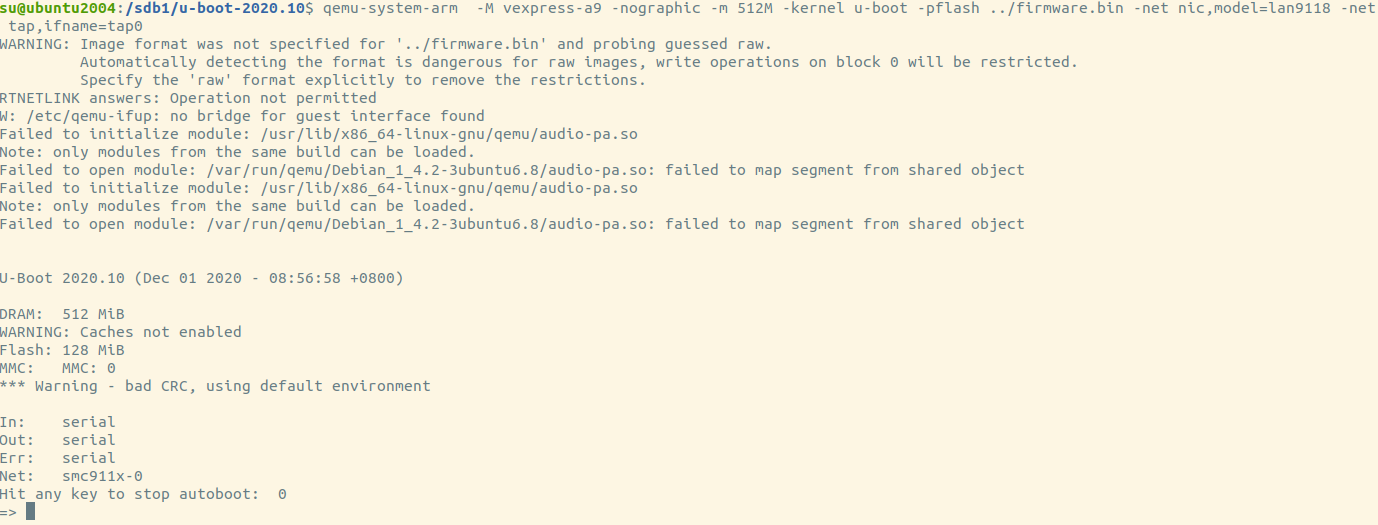
1 | qemu-system-arm -M vexpress-a9 -nographic -m 512M -kernel u-boot -pflash ../firmware.bin |
1 | qemu-system-arm -M vexpress-a9 -nographic -m 512M -kernel u-boot -pflash ../firmware.bin -net nic,model=lan9118 -net tap,ifname=tap0 |
“-net nic,model=lan9118 -net tap,ifname=tap0” for qemu. It’ll use tap0 as it’s simulated nic.
1 | create tap0 |
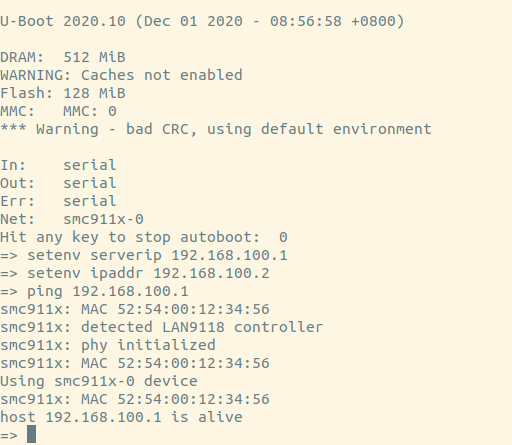
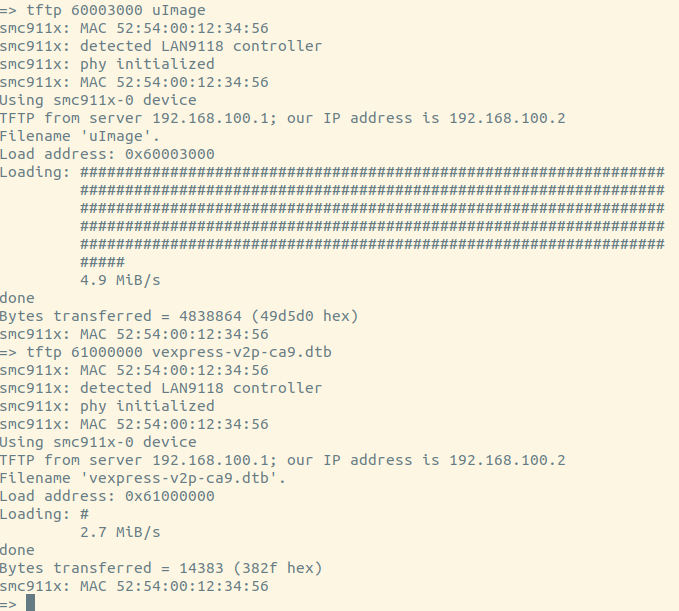
So we can update kernel or rootfs by network now!
ARM嵌入式开发,必定涉及到交叉编译工具链问题,下载交叉编译
工具链时总会有多个选择,我们该选择哪个工具链呢?
我们需要区分armel armhf arm64。
armel
ARM EABI(armel)支持老的32位arm。
armhf
较新的arm hard-float(armhf)支持新一点的32位arm,FPU没有标准化。
arm64
64位的arm支最新的64位arm,默认都带FPU了,已经标准化了。
为何会有如此多种类的工具链需要选择呢?这有arm的历史背景有关。
其实最开始的只有一种arm,后来由于诸多原因如端模式到浮点的支持,它已经被被废弃了,后来的arm EABI (armel)取代了它。
armel(arm eabi little endian)仅仅是个名字而已,用于和老的版本做区分,可以认为它仅仅是对arm最基本的支持,可以被任何硬件运行。
armhf支持硬件FPU,计算更快,而armel则需要对浮点数模拟计算。
arm64默认就支持FPU。
gcc编译的时候,使用-mfloat-abi选项来指定浮点运算使用的
是哪种,soft不使用fpu,armel使用fpu,使用普通寄存器,armhf
使用fpu,使用fpu的寄存器。
1 | apt install glade |
安装glade设计工具,安装gtk开发包(头文件,pkgconfig的配置文件)。
1 |
|
glade设计最简单的窗口。
1 | pkg-config --cflags gtk+-3.0 |
获取编译选项
1 | pkg-config --libs gtk+-3.0 |
获取链接库
1 | g++ `pkg-config --cflags gtk+-3.0` main.c `pkg-config --libs gtk+-3.0` -rdynamic -o main |