Say what you do and do what you say

0%

编写service

1
2
3
4
5
6
7
8
9
[Unit]
After=network.service

[Service]
Type=forking
ExecStart=/usr/local/bin/mystart.sh

[Install]
WantedBy=default.target

设置service类型为forking。

编写脚本

1
2
3
4
5
6
7
#!/bin/bash
echo 'my start script start to run'


echo 'my start script run done'

exit 0

由于设置了service类型为forking,需要在我们的脚本的最后执行exit退出systemd
为我们fork的进程。

ag类似于grep的工具,可以提供更快的搜索。

1
2
3
4
5
6
7
8
9
10
The Silver Searcher is like grep or ack, except faster. It's written in super-optimized C (like grep) and it's intelligent about entirely skipping files that you don't want to waste time searching (like ack).

ag源码
https://github.com/ggreer/the_silver_searcher

ag非官方下载地址

https://blog.kowalczyk.info/software/the-silver-searcher-for-windows.html

https://github.com/k-takata/the_silver_searcher-win32

这个问题我已经遇到好几次,每次都要到网上搜索一番,这里记录一下。

1
2
2020/10/26 01:01:33 tcp:127.0.0.1:50610 accepted tcp:beacons.gcp.gvt2.com:443 [proxy] 
2020/10/26 01:01:35 [Warning] failed to handler mux client connection > v2ray.com/core/proxy/vmess/outbound: connection ends > v2ray.com/core/proxy/vmess/outbound: failed to read header > v2ray.com/core/proxy/vmess/encoding: failed to read response header > websocket: close 1000 (normal)

v2ray报这个错主要是时间不同步问题,只要把客户端时间设置下就解决了。

随着IPv6的大面积普及,我们普通用户也可以拥有“外网”IP了。有了外网IP,可以在任何支持IPv6的设备上访问我们的“服务”。现在有个问题,分配的IPv6地址不是固定的,可能过段时间就变了,如果能自动把整个地址更新到域名提供商处,即DDNS。我们就可以自由访问我们的服务了。

我的域名是在腾讯云处注册的,其它类似操作。

我从外部找到并修改的脚本,xxxx自动替换成自己的配置。

1
2
3
4
5
6
7
8
9
10
11
12
13
14
15
16
17
18
19
20
21
22
23
24
25
26
27
28
29
30
31
32
33
34
35
36
37
38
39
40
41
42
43
44
45
46
47
48
49
50
51
52
53
54
55
56
57
58
59
60
61
62
63
64
65
66
67
68
69
70
71
72
73
74
75
76
77
78
79
80
81
82
#!/bin/ash


domain='xxxx'
subDomain='xxxx'
recordId='xxxx'

sId='xxxx'
sKey='xxxx'
#
# Get record list first, then find out record id whatever you want to update
#
function get_record_list()
{

signatureMethod='HmacSHA1'
timestamp=`date +%s`
nonce=`head -200 /dev/urandom | gnu-cksum | cut -f2 -d" "`
region=bj
url="https://cns.api.qcloud.com/v2/index.php"
action='RecordList'

src=`printf "GETcns.api.qcloud.com/v2/index.php?Action=%s&Nonce=%s&Region=%s&SecretId=%s&SignatureMethod=%s&Timestamp=%s&domain=%s" $action $nonce $region $sId $signatureMethod $timestamp $domain`


signature=`echo -n $src|openssl dgst -sha1 -hmac $sKey -binary |base64`

params=`printf "Action=%s&domain=%s&Nonce=%s&Region=%s&SecretId=%s&Signature=%s&SignatureMethod=%s&Timestamp=%s" $action $domain $nonce $region $sId "$signature" $signatureMethod $timestamp `


curl -G -s -d "$params" --data-urlencode "Signature=$signature" "$url"
}
#
# $1 ipv6
# You provide a new ipv6 address to update your subDomain record
#
function modify_record()
{
signatureMethod='HmacSHA1'

timestamp=`date +%s`
nonce=`head -200 /dev/urandom | cksum | cut -f2 -d" "`
region=bj

url="https://cns.api.qcloud.com/v2/index.php"
#设置新ipv6
action='RecordModify'
recordType='AAAA'
recordLine='默认'

value=$1

timestamp=`date +%s`
nonce=`head -200 /dev/urandom | cksum | cut -f2 -d" "`

src=`printf "GETcns.api.qcloud.com/v2/index.php?Action=%s&Nonce=%s&Region=%s&SecretId=%s&SignatureMethod=%s&Timestamp=%s&domain=%s&recordId=%s&recordLine=%s&recordType=%s&subDomain=%s&value=%s" $action $nonce $region $sId $signatureMethod $timestamp $domain $recordId $recordLine $recordType $subDomain $value`

signature=`echo -n $src|openssl dgst -sha1 -hmac $sKey -binary |base64`

params=`printf "Action=%s&Nonce=%s&Region=%s&SecretId=%s&SignatureMethod=%s&Timestamp=%s&domain=%s&recordId=%s&recordLine=%s&recordType=%s&subDomain=%s&value=%s" $action $nonce $region $sId $signatureMethod $timestamp $domain $recordId $recordLine $recordType $subDomain $value`

result=`curl -G -s -d "$params" --data-urlencode "Signature=$signature" "$url"`
echo $result
}

#
#
# we only get the first ipv6 address that owned by interface
#
get_ipv6()
{
ret=`ip a | grep 2409 | tail -n1 | awk '{print $2}' | awk -F'/' '{print $1}'`
echo $ret
}

#
# Main Entry
#
ipv6=$(get_ipv6)
echo "Assign $ipv6 to xxxx"

modify_record "$ipv6"

获取IPv6的函数需要自己根据情况修改。

给openwrt添加cron任务,让脚本每隔5分钟自动执行,实现DDNS功能。

1
2
root@OpenWrt:~# crontab -l
*/5 * * * * /root/ddns.sh

使用kodi的PVR观看iptv时,画面刷新率不够,到PVR设置页面,把刷新率设置选项关闭,这样电视的刷新率就和系统设置的刷新率一致,不会出现画观看电视面刷新率不够的问题。

install nextcloud

install ocdownloader

这里设置正确的路径否则报无法找到视频地址错误

1
2
controller/ytdownloader.php
$this->YTDLBinary = '/usr/local/bin/youtube-dl'; // default path

install aria2

参考https://gist.github.com/GAS85/79849bfd09613067a2ac0c1a711120a6

注意要想ocdownloader使用aria2,需要设置不加密方式,还是不太安全

install youtube-dl

1
2
apt install python-pip
pip install youtube-dl

关于dma api的使用

关于DMA API的内核文档中提到

1
2
3
4
Note that the DMA API works with any bus independent of the underlying
microprocessor architecture. You should use the DMA API rather than the
bus-specific DMA API, i.e., use the dma_map_*() interfaces rather than the
pci_map_*() interfaces.

推荐使用dma_map_*() 而不是 pci_map_*()。
dma api是独立于总线的接口,使用pci_map_*()是不合适的。

使用该接口时包含相关的头文件,地址使用dma_addr_t。

1
2
#include <linux/dma-mapping.h>
dma_addr_t addr;

哪些内存可以用于DMA

能够用于DMA的内存在大部分平台上是要求物理连续的,因此下面的内存可以用于DMA。

1 page allocator or kmalloc or kmem_cache_alloc

可以直接把这些地址用于dma_map_*()等api

2 vmalloc/vmap地址不可用于DMA,物理上不连续

dma_set_mask_and_coherent

告诉内核外设对dma的支持情况,不管流式还是一致性dma都要这个步骤

如果有特别的需求,可以使用以下的只设置对应方式的dma

1 dma_set_mask 流式
2 dms_set_coherent_mask 一致性

如果以上设置失败,有两种方式
1 使用非dma方式
2 忽略外设

一致性dma

在驱动初始化时映射好,驱动卸载时接触映射,在外设工作中保证访问的一致性
常用于网卡的环形buffer,scsi的mailbox命令结构,设备固件等。

用于DMA的内存存在于驱动的整个生命周期中。

一致性dma不可避免的使用内存屏障。cpu可能执行指令重排,导致外设首先看到的不是想要的数据。

采用如下的内存屏蔽保证驱动正常工作。

1
2
3
desc->word0=address;
wmb();
desc->word1=DESC_VALID;

在某些平台上,驱动刷新写缓存,如写某个寄存器后再都寄存器,需要刷缓存。

流式dma

流式dma是指在dma传输时才映射,一旦传输完就解除映射。除非使用dma_sync_*调用。

流式dma可以认为是异步dma

常用例子是外设的发送接收buffer,scsi外设读写的buffer。

注意dma地址是共享资源,流式dma会比较节省。

参考

1 DMA API

由于debian下使用kodi不是官方推荐的,所以更新发行版到ubuntu 20.04 lts版。
但是kodi经过HDMI连接电视后声音非常小,把电视上音量调到最大,勉强可以听清。

1、排除电视自身的问题

使用电视自带的系统播放视频,声音正常,可以排除电视的问题。

2、kodi设置的问题

google搜索相关的问题得到以下信息。

1
2
3
4
5
6
7
8
9
10
11
12
13
14
https://discourse.coreelec.org/t/solved-sound-volume-via-hdmi-suddenly-very-low/6045/4

A couple of things that might help.

One, plug a keyboard in and press the + key a few times. kodi’s volume indicator should popup to centre of the screen. It’s possible that kodi’s internal sound level ended up turned down some how. Use + and - keys to adjust volume level if this is the case.

Two, check the audio device that you are using, Settings/System/Audio. Try changing it to one that mentions hdmi at the end of it. If it is not already on that one.

The +/- did the trick. Tbh, I didn’t even know Kodi had that key shortcuts.
In all the years I’ve been using Kodi on several platforms, I’ve always used CEC.

For some reason the volume was at one third. Putting it back to 100% and volume was back to normal (for me).

Thanks for the replies!

解决方法是连接键盘,按+/-键,出现kodi音量调节项,设置到最大音量恢复正常。
但是还有点问题,每次电视关掉再打开声音又变小,必须重启kodi才恢复正常。

从一个tcp窗口探测差一问题的patch看TCP协议中的使用的定时器

这个patch的描述如下:

Previously there is an off-by-one bug on determining when to abort
a stalled window-probing socket. This patch fixes that so it is
consistent with tcp_write_timeout().

从描述看关于何时中止执行窗口探测的socket的。下面从协议规范中寻找定时器使用。

TCP协议中的timer

TCP协议中的定时器

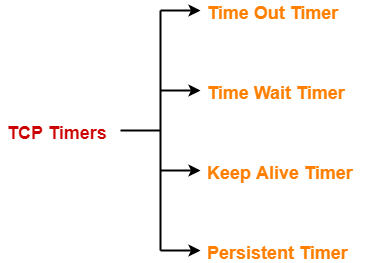
协议中主要有4个定时器,注意这里每个TCP连接都有4个定时器。

  1. Time Out Timer

    TCP uses a time out timer for retransmission of lost segments.

  2. Time Wait Timer

    TCP uses a time wait timer during connection termination.

  3. Keep Alive Timer

    TCP uses a keep alive timer to prevent long idle TCP connections.

  4. Persistent Timer

    TCP uses a persistent timer to deal with a zero-widow-size deadlock situation.
    It keeps the window size information flowing even if the other end closes its receiver window.

从patch的描述看主要涉及窗口探测,即Persistent Timer。

Persistent Timer的作用

Consider the following situation:

  1. Sender receives an acknowledgment from the receiver with zero window size.
  2. This indicates the sender to wait.
  3. Later, receiver updates the window size and and sends the segment with the update to the sender.
  4. This segment gets lost.
  5. Now, both sender and receiver keeps waiting for each other to do something. To deal with such a situation, TCP uses a persistent timer.

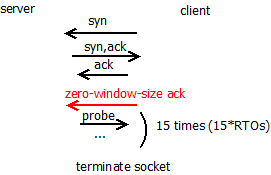
发送测收到zero-window-size的ack报文后,发送测不能再发送报文,等待后续接收测更新窗口大小报文通知。为了防止该通知消息被丢的情况,使用
persistent timer,发送测会周期性的窗口探测报文消息,接收测回应该窗口探测消息。如果窗口大小为0,则继续窗口探测过程;非零则恢复数据传输过程。

接下来分析下在linux内核中TCP协议栈所使用的定时器。

linux内核中的timer

在linux内核中每条tcp连接使用一个inet_connection_sock的结构描述。

1
2
3
4
5
6
7
8
9
struct inet_connection_sock {
struct inet_sock {
struct sock {
struct timer_list sk_timer; //(1) keepalive timer
}
}
struct timer_list icsk_retransmit_timer; //(2) time out timer
struct timer_list icsk_delack_timer; //(3) delay ack timer
}

sk_timer

sk_timer作为keepalive timer使用,在socket设置SOCK_KEEPOPEN时才启用。

keepalive timer流程如下:
keepalive机制

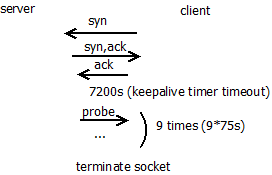
linux内核对keepalive的处理代码如下:

1
2
3
4
5
6
7
8
9
10
11
12
13
14
15
16
17
18
19
20
21
22
23
24
25
26
27
28
29
static void tcp_keepalive_timer (struct timer_list *t)
...
if (elapsed >= keepalive_time_when(tp)) { // 7200s
/* If the TCP_USER_TIMEOUT option is enabled, use that
* to determine when to timeout instead.
*/
if ((icsk->icsk_user_timeout != 0 &&
elapsed >= msecs_to_jiffies(icsk->icsk_user_timeout) &&
icsk->icsk_probes_out > 0) ||
(icsk->icsk_user_timeout == 0 &&
icsk->icsk_probes_out >= keepalive_probes(tp))) { //到达次数限制9
tcp_send_active_reset(sk, GFP_ATOMIC);
tcp_write_err(sk);
goto out;
}
if (tcp_write_wakeup(sk, LINUX_MIB_TCPKEEPALIVE) <= 0) { //发送probe报文
icsk->icsk_probes_out++;
elapsed = keepalive_intvl_when(tp);// 75s
} else {
/* If keepalive was lost due to local congestion,
* try harder.
*/
elapsed = TCP_RESOURCE_PROBE_INTERVAL;
}
} else {
/* It is tp->rcv_tstamp + keepalive_time_when(tp) */
elapsed = keepalive_time_when(tp) - elapsed;
}
...

在上面代码中使用icsk_probes_out对probe次数进行统计。keepalive_probes缺省设置为9。

1
net.ipv4.tcp_keepalive_probes = 9

使用上面的内核选项可以设置该值。

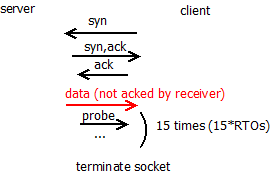
tcp_write_wakeup负责发出probe报文,这个函数首先判断socket发送队列是否
有报文等待发送,如果有则发送sk->sk_send_head报文(注意这个指针总是指向下一个要
发送的报文);如果发送队列空则发送probe报文(注意这个报文的序列号为out of date即无效)。

如果报文能够到达接收测,则接收测回复ack消息。下面是收到ack报文的处理流程:

1
2
3
4
5
6
7
8
9
10
11
12
13
14
15
16
17
18
19
20
21
22
static void tcp_ack_probe(struct sock *sk)
{
struct inet_connection_sock *icsk = inet_csk(sk);
struct sk_buff *head = tcp_send_head(sk);
const struct tcp_sock *tp = tcp_sk(sk);

/* Was it a usable window open? */
if (!head)
return;
if (!after(TCP_SKB_CB(head)->end_seq, tcp_wnd_end(tp))) { // normal window size
icsk->icsk_backoff = 0;
inet_csk_clear_xmit_timer(sk, ICSK_TIME_PROBE0);
/* Socket must be waked up by subsequent tcp_data_snd_check().
* This function is not for random using!
*/
} else { // zero-window-size
unsigned long when = tcp_probe0_when(sk, TCP_RTO_MAX);

tcp_reset_xmit_timer(sk, ICSK_TIME_PROBE0,
when, TCP_RTO_MAX, NULL);
}
}

如果接收测返回报文通知窗口大小为0则继续窗口探测过程,由于有接收到报文,
这时keepalive超时时判断距离上次报文时间不会超过7200s,这样keepalive定时器
重置为7200s超时。

如果报文无法到达接收测,keepalive在75秒后超时,重新发送probe报文直到到达内核设置的
tcp_keepalive_probes次后终止该tcp连接。

linux内核使用icsk_probes_out统计keepalive的探测次数和zero-window-size的探测次数。考虑下面的
一种情况:
keepalive定时器超时了3次后,才从接收测收到ack消息,这时开始窗口探测过程,这里并没有对icsk_probes_out
清零,而是继续增加icsk_probes_out次数,这样处理有意简化窗口探测的过程。

icsk_retransmit_timer

即重传定时器,对应协议中的Time Out Timer和Persistent Timer。
内核使用一个定时器处理重传定时器和zero-window-size的探测定时器使用。

1
net.ipv4.tcp_retries2 = 15

内核设置重传次数和zero-window-size次数限制为上面的值。

zero-window-size机制

retransmit机制

icsk_delack_timer

待更新

参考

  1. tcp协议中的timer
  2. kernel source

问题

最近在看内核一个patch的修改,这个patch的commit描述
如下:

While trying to reproduce a reported kernel panic on arm64, I discovered
that AUTH_GSS basically doesn’t work at all with older enctypes on arm64
systems with CONFIG_VMAP_STACK enabled. It turns out there still a few
places using stack memory with scatterlists, causing krb5_encrypt() and
krb5_decrypt() to produce incorrect results (or a BUG if CONFIG_DEBUG_SG
is enabled).
描述里边提到CONFIG_VMAP_STACK内核宏和scatterlist。下面对它们分析。

CONFIG_VMAP_STACK

CONFIG_VMAP_STACK的功能

1
2
3
4
5
6
7
8
root@ubuntu:/share/linux# find . -name Kconfig | xargs grep -rsn VMAP_STACK
./arch/Kconfig:821:config HAVE_ARCH_VMAP_STACK
./arch/Kconfig:841:config VMAP_STACK
./arch/Kconfig:844: depends on HAVE_ARCH_VMAP_STACK
./arch/arm64/Kconfig:135: select HAVE_ARCH_VMAP_STACK
./arch/s390/Kconfig:133: select HAVE_ARCH_VMAP_STACK
./arch/s390/Kconfig:714: depends on !VMAP_STACK
./arch/x86/Kconfig:152: select HAVE_ARCH_VMAP_STACK if X86_64

从搜索结果看,这个功能是和架构相关的。
再来看下该配置宏的具体描述:

config VMAP_STACK
default y
bool “Use a virtually-mapped stack”
depends on HAVE_ARCH_VMAP_STACK
depends on !KASAN || KASAN_VMALLOC
—help—
Enable this if you want the use virtually-mapped kernel stacks
with guard pages. This causes kernel stack overflows to be
caught immediately rather than causing difficult-to-diagnose
corruption.

To use this with KASAN, the architecture must support backing
virtual mappings with real shadow memory, and KASAN_VMALLOC must
 be enabled.

如果内核开启CONFIG_VMAP_STACK,内核可以快速检测内核栈overflow异常,比之前在内核栈溢出
访问时出问题难以诊断,内核栈溢出肯定访问垃圾数据,其结果不可预测的,难以排查,在有个guardpage后
只要内核栈溢出访问,内核可以快速捕获到。

内核栈的申请通过alloc_thread_stack_node实现。

1
2
3
4
5
6
7
8
9
10
11
12
13
14
15
16
17
18
19
20
21
22
23
24
25
26
27
28
29
30
31
32
33
34
35
36
37
38
39
40
41
42
43
44
45
46
47
48
49
50
51
52
53
54
55
56
57
58
static unsigned long *alloc_thread_stack_node(struct task_struct *tsk, int node)
{
#ifdef CONFIG_VMAP_STACK
void *stack;
int i;

for (i = 0; i < NR_CACHED_STACKS; i++) {
struct vm_struct *s;

s = this_cpu_xchg(cached_stacks[i], NULL);

if (!s)
continue;

/* Clear the KASAN shadow of the stack. */
kasan_unpoison_shadow(s->addr, THREAD_SIZE);

/* Clear stale pointers from reused stack. */
memset(s->addr, 0, THREAD_SIZE);


tsk->stack_vm_area = s;
tsk->stack = s->addr;
return s->addr;
}

/*
* Allocated stacks are cached and later reused by new threads,
* so memcg accounting is performed manually on assigning/releasing
* stacks to tasks. Drop __GFP_ACCOUNT.
*/
stack = __vmalloc_node_range(THREAD_SIZE, THREAD_ALIGN,
VMALLOC_START, VMALLOC_END,
THREADINFO_GFP & ~__GFP_ACCOUNT,
PAGE_KERNEL,
0, node, __builtin_return_address(0));
/*
* We can't call find_vm_area() in interrupt context, and
* free_thread_stack() can be called in interrupt context,
* so cache the vm_struct.
*/
if (stack) {
tsk->stack_vm_area = find_vm_area(stack);
tsk->stack = stack;
}
return stack;

#else
struct page *page = alloc_pages_node(node, THREADINFO_GFP,
THREAD_SIZE_ORDER);

if (likely(page)) {
tsk->stack = page_address(page);
return tsk->stack;
}
return NULL;
#endif
}

为了避免vmalloc的频繁调用,内核使用cached_stacks本地缓存数组,保存进程退出时的内核栈指针。在
创建进程时可以直接从cached_stacks本地缓存数组获取可用的内核栈。

如果cached_stacks本地缓存数组不可用,则通过vmalloc接口申请内核栈。vmalloc申请的空间并不保证是
物理连续的页。

vmalloc申请的空间在使用上要注意:

  1. 不能用于DMA操作

    DMA硬件没有页面映射,需要物理上连续的空间。

  2. 不能用于scatterlist

    后面分析

在不启用CONFIG_VMAP_STACK时,内核使用alloc_pages_node申请内核栈空间。这个接口申请连续的物理页
作为内核栈。

内核栈大小

前面分析了内核栈的分配,那么内核栈占多少空间呢?

THREAD_SIZE宏定义了内核栈的大小。

THREAD_SIZE是架构相关的,在x86上定义为2个page的大小。

1
2
#define THREAD_SIZE_ORDER       1
#define THREAD_SIZE (PAGE_SIZE << THREAD_SIZE_ORDER)

在x86_64上定义为如下大小,开启KASAN,则分配8个page的大小,不开启KSASAN则定义为4个page的大小。

1
2
3
4
5
6
7
8
#ifdef CONFIG_KASAN
#define KASAN_STACK_ORDER 1
#else
#define KASAN_STACK_ORDER 0
#endif

#define THREAD_SIZE_ORDER (2 + KASAN_STACK_ORDER)
#define THREAD_SIZE (PAGE_SIZE << THREAD_SIZE_ORDER)

这里提高了KASAN功能,这个是什么功能呢?

Kasan 是 Kernel Address Sanitizer 的缩写,它是一个动态检测内存错误的工具,主要功能是
检查内存越界访问和使用已释放的内存等问题。Kasan 集成在 Linux 内核中,随 Linux 内核
代码一起发布,并由内核社区维护和发展。

这里不对KASAN功能进行分析,更多的可以参考下面的文档。
KASAN扩展阅读

  1. KASAN内核文档
  2. KASAN简单介绍

内核栈的布局

内核栈布局和架构相关,x86配置如下

1
2
3
4
5
6
7
8
9
10
11
12
13
14
15
16
$ cat arch/x86/Kconfig
config X86
def_bool y
...
select THREAD_INFO_IN_TASK
...

$ cat include/linux/sched.h
struct task_struct {
#ifdef CONFIG_THREAD_INFO_IN_TASK
/*
* For reasons of header soup (see current_thread_info()), this
* must be the first element of task_struct.
*/
struct thread_info thread_info;
#endif

由上可见在x86上,内核栈就是单纯的内核栈,thread_info结构不在内核栈的低端地址上,而是移到了task_struct结构中,这样好处是
内核栈溢出时不会破坏thread_info结构,更加安全。

之前内核栈的布局是这样的,如下所示:

1
2
3
high address                low address 
|----------------------|<-------->|
thread_info

scatterlist

scatterlist用来描述一内存段,其结构如下:

1
2
3
4
5
6
7
8
9
struct scatterlist {
unsigned long page_link;
unsigned int offset;
unsigned int length;
dma_addr_t dma_address;
#ifdef CONFIG_NEED_SG_DMA_LENGTH
unsigned int dma_length;
#endif
};

page_link是page指针,这里复用该page指针使其支持scatterlist chain
每个scatterlist描述一个物理页的内存片段。

为何vmalloc空间不能用于scatterlist呢?

1
2
3
4
         vmalloc buffer
|-------------|
|-------------|-----------|
pageX pageY

如果vmalloc buffer跨page边界,看会发生什么。

1
2
3
4
5
6
7
8
9
10
11
12
13
14
15
16
17
18
19
20
21
22
23
24
25
26
27
28
29
30
31
32
33
34
35
36
37
38
39
$ cat net/sunrpc/auth_gss/gss_krb5_crypto.c
u32
krb5_encrypt(
struct crypto_sync_skcipher *tfm,
void * iv,
void * in,
void * out,
int length)
{
u32 ret = -EINVAL;
struct scatterlist sg[1];
...
memcpy(out, in, length);
sg_init_one(sg, out, length);
...
}
$ cat lib/scatterlist.c
void sg_init_one(struct scatterlist *sg, const void *buf, unsigned int buflen)
{
sg_init_table(sg, 1);
sg_set_buf(sg, buf, buflen);
}
$ cat include/linux/scatterlist.h
static inline void sg_set_buf(struct scatterlist *sg, const void *buf,
unsigned int buflen)
{
#ifdef CONFIG_DEBUG_SG
BUG_ON(!virt_addr_valid(buf));
#endif
sg_set_page(sg, virt_to_page(buf), buflen, offset_in_page(buf));
}
$ cat include/linux/scatterlist.h
static inline void sg_set_page(struct scatterlist *sg, struct page *page,
unsigned int len, unsigned int offset)
{
sg_assign_page(sg, page);
sg->offset = offset;
sg->length = len;
}

在sg_set_page后,scatterlist只记录了pageX,后面的pageY是没有记录的,后面使用scatterlist时
可能访问到垃圾数据。可见vmalloc空间时不能用于scatterlist的。

总结

本文分析了CONFIG_VMAP_STACK和scatterlist的功能,在使能CONFIG_VMAP_STACK后,内核栈上分配的
空间是物理上不连续的,不能用于scatterlist,不能用于DMA。