Say what you do and do what you say

0%

问题

虽然linux不像windows那样需要碎片整理,随着时间的流逝,硬盘空间会
越来越小,有必要对硬件空间清理。以ubuntu为例说明如何清理硬盘空间。

查看硬盘占用

1
2
3
4
5
6
7
8
9
10
11
$ df -h
Filesystem Size Used Avail Use% Mounted on
udev 934M 0 934M 0% /dev
tmpfs 193M 2.6M 191M 2% /run
/dev/sda1 8.8G 6.5G 1.9G 78% /
tmpfs 965M 0 965M 0% /dev/shm
tmpfs 5.0M 0 5.0M 0% /run/lock
tmpfs 965M 0 965M 0% /sys/fs/cgroup
tmpfs 193M 0 193M 0% /run/user/0
tmpfs 193M 0 193M 0% /run/user/1000
/dev/sdb1 127G 3.0G 125G 3% /share

这里根分区可用空间不足,需要对根分区下目录空间占用进行分析。

查看根分区目录空间占用

1
2
3
4
5
6
7
8
9
10
11
12
13
14
15
16
17
18
19
20
21
22
23
24
25
26
27
$ du -h --max-depth=1 /
23M /opt
0 /dev
236M /boot
8.0K /snap
5.8M /lib32
3.1G /usr
0 /sys
156M /root
16K /lost+found
0 /proc
12K /media
4.0K /srv
6.5M /libx32
4.0K /lib64
4.0K /mnt
12M /etc
1.1G /lib
2.8G /share
704M /var
2.9M /run
18M /bin
1.1G /home
19M /sbin
48K /tmp
4.0K /nextcloud
9.2G /

随着时间的流逝,log目录会比较大,可以通过journalctl命令控制日志文件所占空
间的大小。

1
$ journalctl --vaccum-size=100M

清空安装的软件包备份

ubuntu把安装的软件包缓存在如下目录:

1
2
$ ls /var/cache/apt/archives/
lock partial

然后通过下面的命令删除缓存的安装包。

1
$ apt clean

总结

通过以上步骤,硬盘空间大了许多。

头文件设置

要想能够成功编译bpf程序,需要正确的设置头文件,在linux内核版本3.7之后引入了uapi,下面是uapi的简单介绍。

首先介绍下uapi
uapi主要是以下两个目录

1
2
kernel_dir/include/uapi
kernel_dir/arch/$ARCH/include/uapi

uapi的目的是让头文件更加清晰,只有上面的头文件是用户态可以使用的,其它的作为内核私有头文件使用。

在编译bpf程序时我们要用到内核头文件,而不仅仅上上面的uapi的头文件

1
2
3
kernel_dir/arch/$ARCH/include
kernel_dir/arch/$ARCH/include/generated
kernel_dir/include

关于这个例子的编译,如果使用内核头文件会遇到问题,例子中带了include/types.h,这个头文件和内核头文件冲突,可行workaround方案是把自带include放到编译选项的最后。
编译器在寻找头文件是总是按照编译选项中列出目录先后的顺序搜索

另外看下uapi/linux/types.h文件

1
2
3
4
5
6
7
8
9
10
11
12
13
#ifndef _UAPI_LINUX_TYPES_H
#define _UAPI_LINUX_TYPES_H

#include <asm/types.h>

#ifndef __ASSEMBLY__
#ifndef __KERNEL__
#ifndef __EXPORTED_HEADERS__
#warning "Attempt to use kernel headers from user space, see http://kernelnewbies.org/KernelHeaders"
#endif /* __EXPORTED_HEADERS__ */
#endif

#include <linux/posix_types.h>

我们在使用时需要定义KERNEL宏。

一个可用的头文件包含选项

1
2
3
4
5
6
7
8
9
linuxhdrs ?= /usr/src/linux-headers-`uname -r`
LINUXINCLUDE = -I$(linuxhdrs)/arch/x86/include \
-I$(linuxhdrs)/arch/x86/include/generated \
-I$(linuxhdrs)/arch/x86/include/uapi \
-I$(linuxhdrs)/arch/x86/include/generated/uapi \
-I$(linuxhdrs)/include/generated/uapi \
-I$(linuxhdrs)/include \
-I$(linuxhdrs)/include/uapi \
-include $(linuxhdrs)/include/linux/kconfig.h

在头文件设置好后,还需要额外编译选项用于编译bpf程序

1
2
3
4
5
6
7
8
9
10
11
12
13
14
15
16
17
18
19
CLANG ?= clang
INC_FLAGS = -nostdinc -isystem $(shell $(CLANG) -print-file-name=include)
EXTRA_CFLAGS ?= -O2 -g -Wall -emit-llvm
LLC ?= llc
CLANG ?= clang
LLVM_OBJDUMP ?= llvm-objdump

$(KERNELOBJS): %.o:%.c
$(CLANG) $(INC_FLAGS) \
-D__KERNEL__ -D__ASM_SYSREG_H \
$(DEBUG_FLAGS) \
-Wno-unused-value -Wno-pointer-sign \
-Wno-compare-distinct-pointer-types \
-Wno-gnu-variable-sized-type-not-at-end \
-Wno-address-of-packed-member -Wno-tautological-compare \
-Wno-unknown-warning-option \
$(LINUXINCLUDE) \
-I../include \
$(EXTRA_CFLAGS) -c $< -o -| $(LLC) -march=bpf -filetype=obj -o $@

一个bpf程序框架

这里是我整理的一个bpf框架,地址是bpf_skeleton

这里讲下遇到的问题。首先是内核部分,按照上面一节设置头文件后问题不大,

1
2
root@ubuntu:~/bpftest/bpf_skeleton# ls kern
bitehist.c bpf_endian.h bpf_helpers.h Makefile

可能对为何需要bpf_helpers.h有疑问,bpf程序最终是编译成bpf字节码,由bpf虚拟机执行,这里把bpf函数设置为整数标识,最后由llvm生成对bpf内核函数的调用。

1
2
3
4
5
static void *(*bpf_map_lookup_elem)(void *map, void *key) =
(void *) BPF_FUNC_map_lookup_elem;
static int (*bpf_map_update_elem)(void *map, void *key, void *value,
unsigned long long flags) =
(void *) BPF_FUNC_map_update_elem;

上面只是对bpf函数赋值为bpf内核函数对应的整数标识

为使用libbpf,这里通过在内核源码目录下编译安装

1
2
cd kernel_dir/tools/lib/bpf
make && make install && make install_headers

这样缺省头文件安装到/usr/local/include,库文件安装到/usr/local/lib64下面

1
2
3
root@ubuntu:~/bpftest/bpf_skeleton# ls user/
bitehist.c bpf_load.c linux perf-sys.h
bitehist_kern.o bpf_load.h Makefile

可能注意到为何有linux/types.h,uapi不是有对应头文件吗? 使用uapi下的types.h需要定义KERNEL,这里使用tools下自带的,可以不依赖内核头文件就可以编译用户态代码
bpf_load.c是从samples/bpf下拷贝过来的,里面是bpd加载的实用函数,非常方便。

总结

经过上面步骤,我们拥有了一个可以使用的bpf框架,开始编写自己的bpf程序吧

参考

  1. BPF tools

bpf的build环境

简单讲,bpf是内核内置的虚拟机,对bpf的支持,内核需要开启编译选项如下

1
2
3
4
5
6
7
CONFIG_BPF=y
CONFIG_BPF_SYSCALL=y
CONFIG_NET_CLS_BPF=m
CONFIG_NET_ACT_BPF=m
CONFIG_BPF_JIT=y
CONFIG_HAVE_BPF_JIT=y
CONFIG_BPF_EVENTS=y

[1]中是在oracle linux上面的介绍,在ubuntu1804上遇到很多问题,这里把问题列举下。

build environment

1
2
3
4
5
6
7
8
9
10
11
Distro: ubuntu 1804
Kernel: 5.3.0-42
Packages:
linux-image-5.3.0-42-generic
linux-image-5.3.0-42-generic-dbgsym
linux-headers-5.3.0-42-generic
linux-headers-5.3.0-42
linux-source-5.3.0
llvm-9
clang-9
libelf-dev

在ubuntu1804上我安装了5.3.0的内核,llvm和clang都是安装的9的,另外要安装elf开发库。由于Makefile中使用clang和llc命令,这里建立软链接

1
2
ln -s /usr/bin/llc-9 /usr/bin/llc
ln -s /usr/bin/clang-9 /usr/bin/clang

把代码clone到本地

1
git clone https://github.com/oracle/linux-blog-sample-code.git

master分支只有README,源码文件在bpf-test分支上,所以切换分支

1
git checkout -b bpf-test origin/bpf-test

这时编译例子程序,有如下错误

1
2
3
4
5
6
$ cd bpf-test
$ make
...
LLVM ERROR: 'helper_test_init' label emitted multiple times to assembly file
Makefile:69: recipe for target 'test_bpf_helper_init_kern.o' failed
...

这里提到如果section名字和函数名字一样,clang会报错。我们可以
修改一下函数名字。

1
2
bpf/test_bpf_helper_init_kern.c
helper_test_init => helper_test_init_prog

继续编译发现还有类似错误,可以按照这种方式修改。由于其它地方使用了宏方式定义section,这里修改宏定义,在函数名后追加_prog

1
2
3
4
5
bpf/test_bpf_helper_kern.h

#define BPF_HELPER_TEST_FUNC(helper, name, direction) \
SEC(BPF_HELPER_TEST_NAME(helper, name, direction)) \
static __always_inline int helper##_##name##_##direction##_prog(struct __sk_buff *skb)

这样bpf程序可以正确编译出来,后面开始运行例子程序。

run problem

在运行程序时有如下错误

1
2
3
4
5
6
7
8
9
10
11
12
13
14
15
16
17
18
19
20
root@ubuntu:~/bpftest/linux-blog-sample-code/bpf-test# make test
make -C bpf test
make[1]: Entering directory '/root/bpftest/linux-blog-sample-code/bpf-test/bpf'
make[1]: 'test' is up to date.
make[1]: Leaving directory '/root/bpftest/linux-blog-sample-code/bpf-test/bpf'
make -C user test
make[1]: Entering directory '/root/bpftest/linux-blog-sample-code/bpf-test/user'
bash test_bpf_helper_run.sh
before setup
0 maps not supported in current map section!
Error fixing up map structure, incompatible struct bpf_elf_map used?
Error fetching ELF ancillary data!
Unable to load program
setup ok
could not find map bpf_helper_test_map: No such file or directory
Makefile:63: recipe for target 'test' failed
make[1]: *** [test] Error 1
make[1]: Leaving directory '/root/bpftest/linux-blog-sample-code/bpf-test/user'
Makefile:69: recipe for target 'test-user' failed
make: *** [test-user] Error 2

大致是说在bpf程序中找不到map。

测试命令执行的是以下命令

1
2
3
tc filter add dev veth1 ingress bpf da \
obj ../bpf/test_bpf_helper_init_kern.o \
sec helper_test_init

tc是iproute2包中的命令,这里是iproute2的upstream地址。

1
2
3
4
5
git clone https://github.com/shemminger/iproute2.git
grep "maps not supported" -rsn ./
...
./lib/bpf.c:1886: fprintf(stderr, "struct bpf_elf_map too small, not supported!\n");
...

看下报错的代码

1
2
3
4
5
6
7
8
9
10
11
12
13
14
15
16
17
18
19
20
21
22
23
24
25
26
27
28
29
30
31
static int bpf_fetch_maps_end(struct bpf_elf_ctx *ctx)
{
struct bpf_elf_map fixup[ARRAY_SIZE(ctx->maps)] = {};
int i, sym_num = bpf_map_num_sym(ctx);
__u8 *buff;

if (sym_num == 0 || sym_num > ARRAY_SIZE(ctx->maps)) {
fprintf(stderr, "%u maps not supported in current map section!\n",
sym_num);
...
static int bpf_map_num_sym(struct bpf_elf_ctx *ctx)
{
int i, num = 0;
GElf_Sym sym;

for (i = 0; i < ctx->sym_num; i++) {
int type;

if (gelf_getsym(ctx->sym_tab, i, &sym) != &sym)
continue;

type = GELF_ST_TYPE(sym.st_info);
if (GELF_ST_BIND(sym.st_info) != STB_GLOBAL ||
(type != STT_NOTYPE && type != STT_OBJECT) ||
sym.st_shndx != ctx->sec_maps)
continue;
num++;
}

return num;
}

可见bpf_map_num_sym返回了0。以上是iproute2的upstream代码,检查符号类型,如果不是STT_NOTYPE和STT_OBJECT则跳过,我们需要看下ubuntu中iproute2的代码。
安装ubuntu中iproute2源码包。

下面命令会安装ubuntu仓库中最新的iproute2源码包

1
$ apt source iproute2

可能你需要特定版本的源码包,这时需要检查系统iproute2的版本号。

1
2
3
root@ubuntu:~/iproute2/debian# dpkg -l | grep iproute2
ii iproute2 4.15.0-2ubuntu1 amd64 networking and traffic control tools
root@ubuntu:~# apt source iproute2=4.15.0

这样我们可以检查对应版本4.15.0的iproute2的中bpf_map_num_sym的实现。

1
2
3
4
5
6
7
8
9
10
11
12
13
14
15
16
17
18
static int bpf_map_num_sym(struct bpf_elf_ctx *ctx)
{
int i, num = 0;
GElf_Sym sym;

for (i = 0; i < ctx->sym_num; i++) {
if (gelf_getsym(ctx->sym_tab, i, &sym) != &sym)
continue;

if (GELF_ST_BIND(sym.st_info) != STB_GLOBAL ||
GELF_ST_TYPE(sym.st_info) != STT_NOTYPE ||
sym.st_shndx != ctx->sec_maps)
continue;
num++;
}

return num;
}

检查符号的类型,如果不是STT_NOTYPE则跳过。这里和upstream实现是有区别的,我们接下来需要确认我们生成的bpf程序中符号的类型。

首先确认有maps段

1
2
3
4
5
6
7
8
9
10
11
12
13
14
15
16
17
18
19
20
21
22
23
24
25
26
27
28
29
30
31
32
33
root@ubuntu:~/bpftest/linux-blog-sample-code/bpf-test# llvm-readelf-9 --sections bpf/test_bpf_helper_init_kern.o

There are 23 section headers, starting at offset 0x3068:

Section Headers:
[Nr] Name Type Address Off Size ES Flg Lk Inf Al
[ 0] NULL 0000000000000000 000000 000000 00 0 0 0
[ 1] .strtab STRTAB 0000000000000000 002e10 000256 00 0 0 1
[ 2] .text PROGBITS 0000000000000000 000040 000000 00 AX 0 0 4
[ 3] helper_test_init PROGBITS 0000000000000000 000040 000010 00 AX 0 0 8
[ 4] .rodata.str1.1 PROGBITS 0000000000000000 000050 00025f 01 AMS 0 0 1
[ 5] .data PROGBITS 0000000000000000 0002b0 0001c0 00 WA 0 0 16
[ 6] .rel.data REL 0000000000000000 0023c0 000370 10 22 5 8
[ 7] maps PROGBITS 0000000000000000 000470 00001c 00 WA 0 0 4
[ 8] license PROGBITS 0000000000000000 00048c 000004 00 WA 0 0 1
[ 9] .debug_str PROGBITS 0000000000000000 000490 0003c3 01 MS 0 0 1
[10] .debug_abbrev PROGBITS 0000000000000000 000853 000103 00 0 0 1
[11] .debug_info PROGBITS 0000000000000000 000956 000568 00 0 0 1
[12] .rel.debug_info REL 0000000000000000 002730 000680 10 22 11 8
[13] .debug_macinfo PROGBITS 0000000000000000 000ebe 000001 00 0 0 1
[14] .BTF PROGBITS 0000000000000000 000ebf 0006b9 00 0 0 1
[15] .rel.BTF REL 0000000000000000 002db0 000020 10 22 14 8
[16] .BTF.ext PROGBITS 0000000000000000 001578 000058 00 0 0 1
[17] .rel.BTF.ext REL 0000000000000000 002dd0 000020 10 22 16 8
[18] .eh_frame PROGBITS 0000000000000000 0015d0 000030 00 A 0 0 8
[19] .rel.eh_frame REL 0000000000000000 002df0 000010 10 22 18 8
[20] .debug_line PROGBITS 0000000000000000 001600 000141 00 0 0 1
[21] .rel.debug_line REL 0000000000000000 002e00 000010 10 22 20 8
[22] .symtab SYMTAB 0000000000000000 001748 000c78 18 1 129 8
Key to Flags:
W (write), A (alloc), X (execute), M (merge), S (strings), l (large)
I (info), L (link order), G (group), T (TLS), E (exclude), x (unknown)
O (extra OS processing required) o (OS specific), p (processor specific)

从上面的输出看有maps段,再看下maps段的符号

1
2
3
4
5
6
7
8
9
10
./bpf/test_bpf_helper_kern.h
struct bpf_elf_map SEC("maps") bpf_helper_test_map = {
.type = BPF_MAP_TYPE_HASH,
.size_key = sizeof(long),
.size_value = sizeof(long),
.pinning = PIN_GLOBAL_NS,
.max_elem = 256,
};
root@ubuntu:~/bpftest/linux-blog-sample-code/bpf-test# llvm-readelf-9 -s bpf/test_bpf_helper_init_kern.o | grep bpf_helper_test_map
130: 0000000000000000 28 OBJECT GLOBAL DEFAULT 7 bpf_helper_test_map

哇,这里bpf_helper_test_map的类型是OBJECT,tc程序认为不是有效的符号而跳过了。我们需要修改iproute2的代码重新打包,注意有3个函数都需要修改。

1
2
3
bpf_map_num_sym
bpf_map_verify_all_offs
bpf_map_fetch_name

关于debian下编译打包参考这里
这里列下简单步骤

1
2
3
4
5
6
7
8
mkdir YourPackage
cd YourPackage
apt source -t bionic iproute2
apt build-dep -y -t bionic iproute2
vim lib/bpf.c ==> modify the source code
dpkg-buildpackge --commit
dpkg-buildpackge
dpkg -i ../iproute2*.deb

这时例子程序可以成功运行了。

1
make test

reference

  1. How to build bpf program out of the kernel tree

copy_file_range问题

在使用3.10内核的过程中遇到一个关于copy_file_range的问题,拷贝后数据不对。有必要对这个系统调用分析一下。

copy_file_range

copy_file_range是最近新增的[2]syscall,在不需要内核和用户态缓存间的拷贝就可以高效实现文件间的拷贝。传统的文件拷贝流程涉及内核page cache到用户缓存,然后由用户缓存再拷贝到内核page cache,中间涉及两次拷贝,效率不高。copy_file_range正是对拷贝的优化,内部实现是通过pipe buffer的结构,在读取源文件时把涉及到的page cache内存页,页内offset,长度信息,保存到pipe buffer中,在向目标文件拷贝时直接读取pipe buffer信息,执行后续写操作,这样仅需要一次拷贝就完成了。

copy_file_range的流程图如下
copy_file_range flow chart
可以看到最终调用pipe_to_file。下面看下该函数的实现。

1
2
3
4
5
6
7
8
9
10
11
12
13
14
15
16
17
18
19
20
21
22
23
24
25
26
27
28
29
30
31
32
33
34
35
int pipe_to_file(struct pipe_inode_info *pipe, struct pipe_buffer *buf,
struct splice_desc *sd)
{
struct file *file = sd->u.file;
struct address_space *mapping = file->f_mapping;
unsigned int offset, this_len;
struct page *page;
void *fsdata;
int ret;

offset = sd->pos & ~PAGE_CACHE_MASK;

this_len = sd->len;
if (this_len + offset > PAGE_CACHE_SIZE)
this_len = PAGE_CACHE_SIZE - offset;

ret = pagecache_write_begin(file, mapping, sd->pos, this_len,
AOP_FLAG_UNINTERRUPTIBLE, &page, &fsdata);
if (unlikely(ret))
goto out;

if (buf->page != page) {
char *src = buf->ops->map(pipe, buf, 1);
char *dst = kmap_atomic(page);

memcpy(dst + offset, src + buf->offset, this_len);
flush_dcache_page(page);
kunmap_atomic(dst);
buf->ops->unmap(pipe, buf, src);
}
ret = pagecache_write_end(file, mapping, sd->pos, this_len, this_len,
page, fsdata);
out:
return ret;
}

上面第22行判断如果不是同一page时才会执行数据拷贝操作,如果是同一page,则不执行数据操作。这样copy_file_range就不适用同一文件中拷贝。如果执行copy_file_range测试指定的是同一文件,在源偏移和目标偏移很小,即小于一个page大小时,pipe_to_file就不执行数据操作,从而导致拷贝数据不一致。

内核upstream上的处理流程如下图:
cop_file_range

最新版的内核已经抛弃对pipe_to_file的调用,该函数也已经从内核移除。最终的实现调用的是iov_iter_copy_from_user_atomic负责完成数据操作。

1
2
3
4
5
6
7
8
9
10
11
12
13
14
15
16
17
18
19
20
21
22
size_t iov_iter_copy_from_user_atomic(struct page *page,
struct iov_iter *i, unsigned long offset, size_t bytes)
{
char *kaddr = kmap_atomic(page), *p = kaddr + offset;
if (unlikely(!page_copy_sane(page, offset, bytes))) {
kunmap_atomic(kaddr);
return 0;
}
if (unlikely(iov_iter_is_pipe(i) || iov_iter_is_discard(i))) {
kunmap_atomic(kaddr);
WARN_ON(1);
return 0;
}
iterate_all_kinds(i, bytes, v,
copyin((p += v.iov_len) - v.iov_len, v.iov_base, v.iov_len),
memcpy_from_page((p += v.bv_len) - v.bv_len, v.bv_page,v.bv_offset, v.bv_len),
memcpy((p += v.iov_len) - v.iov_len, v.iov_base, v.iov_len)
)
kunmap_atomic(kaddr);
return bytes;
}
EXPORT_SYMBOL(iov_iter_copy_from_user_atomic);

iov_iter_copy_from_user_atomic的流程图:
iov_iter_copy_from_user_atomic

iov_iter_copy_from_user_atomic函数并不关心源和目标page是否是同一page,他们之间是否会出现覆盖的情>况,仅仅是执行数据操作。如果数据源和数据目标有覆盖则copy_file_range的结果是有问题的。

数据覆盖的情况如下图:
iov_iter_copy_from_user_atomic

结论

在使用copy_file_range时一定要注意针对同一文件执行copy_file_range,结果有可能发生覆盖,导致结果并不是我们预期的。这个和memcpy一样,在有覆盖时结果时不可预期的。

参考

  1. copy_file_range()
  2. read_write.c

关于dwarf

一种调试文件格式,用于支持源码级调试功能。它通过树结构描述一个程序,每个节点有子节点或兄弟节点。节点可以表示类型变量、或函数
dwarf使用一系列的DIE(debugging information entries)表示源程序。每个DIE包含一个tag标签标识和一系列属性。每个或多个DIE组成一组标识程序中某个实体,或是程序或者变量等等。

readelf

readelf –debug-dump=info vmlinux

输出.debug_info段中调试信息

下面举个例子。
readelf --debug-dump=info vmlinux | grep dentry_open

通过上面的命令可以得到如下信息

1
2
3
4
5
6
7
8
89773762- <1><aa9c983>: Abbrev Number: 57 (DW_TAG_subprogram)
89773763- <aa9c984> DW_AT_external : 1
89773764- <aa9c984> DW_AT_declaration : 1
89773765: <aa9c984> DW_AT_linkage_name: (indirect string, offset: 0x105b80): dentry_open
89773766: <aa9c988> DW_AT_name : (indirect string, offset: 0x105b80): dentry_open
89773767- <aa9c98c> DW_AT_decl_file : 55
89773768- <aa9c98d> DW_AT_decl_line : 2493
89773769- <aa9c98f> DW_AT_decl_column : 22

dentry_open是一个函数,在2493行被声明的。
可以用readelf查看各种信息。
在后面的参考中,[2]有对dwarf的详细介绍。

参考

  1. Exploring the DWARF debug format information
  2. Debugging Tools Intro DWARF,ELF,GDB,build-id

问题

最近有个需求是关于签名,这里借此对非对称加密和签名机制了解一下。

简介

RSA是一种重要的非对称加密算法,应用非常广泛。

关于RSA的介绍可以参考wiki

RSA算法基于大素数整数无法执行因子分解的,目前推荐的长度至少1024。

加密

这里以简单的示意图说明:

非对称加密示意

签名

签名示意

如果遇到中间人攻击修改了消息内容,Bob对消息执行md5/sha1/sha256时得到的digist和解密得到的digist不同,从而知道消息被篡改。

openssl应用

1
openssl genrsa -out my.key 1024

以上生成rsa私钥文件,注意这里时私钥文件,并不是说rsa私钥。rsa私钥文件有自己的格式,从里边内容可以推导出rsa私钥和rsa公钥。
关于rsa私钥文件格式参考这里

使用openssl的python接口编程

1
2
3
4
5
6
7
8
9
10
11
12
13
14
15
16
17
18
19
20
21
22
23
24
25
26
27
28
29
30
31
32
33
34
35
36
37
38
39
40
41
42
43
44
45
46
47
48
49
50
51
52
53
54
55
56
57
58
59
60
61
62
63
64
65
66
67
68
69
70
71
72
73
74
75
76
77
78
79
80
81
82
83
# -*- coding: utf-8 -*-

"""
Certificate generation module.
"""

from OpenSSL import crypto

TYPE_RSA = crypto.TYPE_RSA
TYPE_DSA = crypto.TYPE_DSA

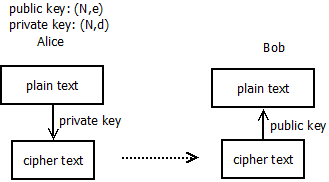
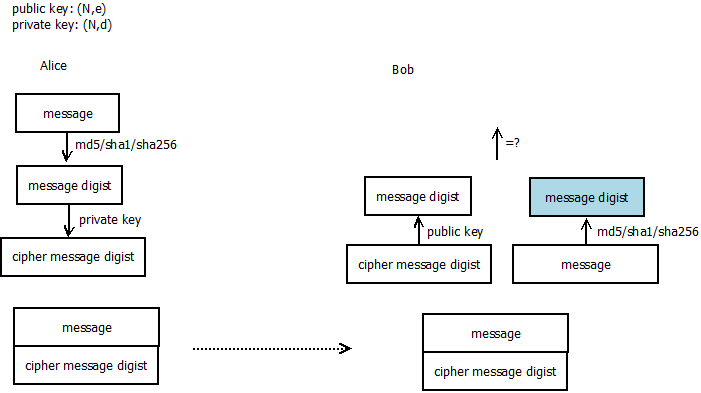
def createKeyPair(type, bits):
"""
Create a public/private key pair.
Arguments: type - Key type, must be one of TYPE_RSA and TYPE_DSA
bits - Number of bits to use in the key
Returns: The public/private key pair in a PKey object
"""
pkey = crypto.PKey()
pkey.generate_key(type, bits)
return pkey

def createCertRequest(pkey, digest="md5", **name):
"""
Create a certificate request.
Arguments: pkey - The key to associate with the request
digest - Digestion method to use for signing, default is md5
**name - The name of the subject of the request, possible
arguments are:
C - Country name
ST - State or province name
L - Locality name
O - Organization name
OU - Organizational unit name
CN - Common name
emailAddress - E-mail address
Returns: The certificate request in an X509Req object
"""
req = crypto.X509Req()
subj = req.get_subject()

for (key,value) in name.items():
setattr(subj, key, value)

req.set_pubkey(pkey)
req.sign(pkey, digest)
return req

def createCertificate(req, (issuerCert, issuerKey), serial, (notBefore, notAfter), digest="md5"):
"""
Generate a certificate given a certificate request.
Arguments: req - Certificate reqeust to use
issuerCert - The certificate of the issuer
issuerKey - The private key of the issuer
serial - Serial number for the certificate
notBefore - Timestamp (relative to now) when the certificate
starts being valid
notAfter - Timestamp (relative to now) when the certificate
stops being valid
digest - Digest method to use for signing, default is md5
Returns: The signed certificate in an X509 object
"""
cert = crypto.X509()
cert.set_serial_number(serial)
cert.gmtime_adj_notBefore(notBefore)
cert.gmtime_adj_notAfter(notAfter)
cert.set_issuer(issuerCert.get_subject())
cert.set_subject(req.get_subject())
cert.set_pubkey(req.get_pubkey())
cert.sign(issuerKey, digest)
return cert

cakey = createKeyPair(TYPE_RSA, 1024)
careq = createCertRequest(cakey, CN='Certificate Authority')
cacert = createCertificate(careq, (careq, cakey), 0, (0, 60*60*24*365*5)) # five years
open('simple/CA.pkey', 'w').write(crypto.dump_privatekey(crypto.FILETYPE_PEM, cakey))
open('simple/CA.cert', 'w').write(crypto.dump_certificate(crypto.FILETYPE_PEM, cacert))
for (fname, cname) in [('client', 'Simple Client'), ('server', 'Simple Server')]:
pkey = createKeyPair(TYPE_RSA, 1024)
req = createCertRequest(pkey, CN=cname)
cert = createCertificate(req, (cacert, cakey), 1, (0, 60*60*24*365*5)) # five years
open('simple/%s.pkey' % (fname,), 'w').write(crypto.dump_privatekey(crypto.FILETYPE_PEM, pkey))
open('simple/%s.cert' % (fname,), 'w').write(crypto.dump_certificate(crypto.FILETYPE_PEM, cert))

总结

对签名的简单理解:

  1. 关于自签名证书,使用自己的私钥对证书签名。证书有很多内容,如有效期和commonName。

  2. 正常使用是通过可信的第三方CA机构签发证书,然后把私钥文件和证书文件发给客户。

  3. 注意私钥文件可以推导出公钥和私钥信息。证书文件中包含公钥信息,通过得到公钥信息就可以和客户安全通信。

关于chacl的分析

最近在nfs上面遇到chacl问题,这里记录下分析过程。

ls命令

ls命令根据系统调用getxattr的返回值判断是否要打印”+”

https://github.com/coreutils/coreutils/blob/master/src/ls.c

1
2
3
4
5
6
7
8
9
10
			  
if (! any_has_acl)
modebuf[10] = '\0';
else if (f->acl_type == ACL_T_LSM_CONTEXT_ONLY)
modebuf[10] = '.';
else if (f->acl_type == ACL_T_YES)
modebuf[10] = '+'; // 有acl数据则打印"+"
```

https://github.com/coreutils/gnulib/blob/master/lib/file-has-acl.c

int file_has_acl (char const *name, struct stat const *sb)
{
#if USE_ACL
if (! S_ISLNK (sb->st_mode))
{

if GETXATTR_WITH_POSIX_ACLS

  ssize_t ret;

  ret = getxattr (name, XATTR_NAME_POSIX_ACL_ACCESS, NULL, 0); //是否有acl数据
  if (ret < 0 && errno == ENODATA)
    ret = 0;
  else if (ret > 0)
    return 1;

  if (ret == 0 && S_ISDIR (sb->st_mode))
    {
      ret = getxattr (name, XATTR_NAME_POSIX_ACL_DEFAULT, NULL, 0);
      if (ret < 0 && errno == ENODATA)
        ret = 0;
      else if (ret > 0)
        return 1;
    }

  if (ret < 0)
    return - acl_errno_valid (errno);
  return ret;
...
1
2
3
4
5
6


## 3.10内核中getxattr

chacl会调用getxattr。

getxattr
- vfs_getxattr
- nfs3_getxattr

1
2

nfs3_getxattr@fs/nfs/nfs3acl.c

acl = nfs3_proc_getacl(inode, type);
if (IS_ERR(acl))
return PTR_ERR(acl);
else if (acl) {
if (type == ACL_TYPE_ACCESS && acl->a_count == 0)
error = -ENODATA;
else
error = posix_acl_to_xattr(&init_user_ns, acl, buffer, size);
posix_acl_release(acl);
} else
error = -ENODATA;//如果nfs3_proc_getacl返回null则返回ENODATA

nfs3_proc_getacl@fs/nfs/nfs3acl.c

if (res.acl_access != NULL) {
if (posix_acl_equiv_mode(res.acl_access, NULL) == 0) {//对于标准权限则置空acl
posix_acl_release(res.acl_access);
res.acl_access = NULL;
}
}

1
2
3
4
5

nfs3_getxattr对于标准权限总是返回ENODATA,所以ls时不会出现"+"。


## 4.18内核getxattr

getxattr
- vfs_getxattr
- posix_acl_xattr_get

1
posix_acl_xattr_get@fs/posix_acl.c

acl = get_acl(inode, handler->flags);
if (IS_ERR(acl))
return PTR_ERR(acl);
if (acl == NULL)
return -ENODATA;

1
get_acl@fs/posix_acl.c

acl = get_cached_acl(inode, type);
if (!is_uncached_acl(acl))
return acl;

1
2
3
4
5
				
如果inode->i_acl inode->i_default_acl有效则使用它,
否则执行nfs3_get_acl,nfs3_get_acl对于标准权限总是返回NULL,从而getxattr返回ENODATA.

nfs3_get_acl@fs/nfs/nfs3acl.c

if (res.acl_access != NULL) {
if ((posix_acl_equiv_mode(res.acl_access, NULL) == 0) ||
res.acl_access->a_count == 0) {
posix_acl_release(res.acl_access);
res.acl_access = NULL;
}
}

```

在chacl之后如果inode->i_acl有效,getxattr返回acl数据。

结论

出现问题的根本原因是4.18内核使用generic acl功能框架,缓存了错误的acl,导致出问题。

最新的内核有patch修正该问题。
即在setacl的时候总是置inode->i_acl无效。

NAND Flash接口介绍

Nand Flash以廉价,高密度得到了广泛应用,这里介绍下Nand相关接口。目前
Nand Flash有两类接口,一类是三星和东芝主导的Toggle NAND接口,一类是其它
Flash厂商包括Cypress主导的ONFI接口。

  1. traditional NAND interface
    15 pins with 8 data bus and other control signals

    1
    2
    3
    4
    5
    6
    7
    8
    DQ[7:0] Bidirectional, 8 bits data bus
    CE# input 片选信号
    ALE input
    CLE input
    RE# input
    WE# input
    WP# input
    RY/BY# output 通知控制器操作完成或者空闲

    没有时钟信号,该接口是异步接口
    最高速率达40Mbps

  2. ONFI NAND v1.0 interface
    add addtional pins for more functions

    1
    2
    3
    4
    5
    6
    7
    8
    9
    10
    IO[7:0]  Bidirectional, 8 bits data bus(Mandatory)
    IO[15:8] Bidirectional, upper 8 bits data bus(Optional)
    IO2[7:0] Bidirectional, second 8 bits data bus(Optional)
    CE#[3:0] input 支持4个片选
    ALE[1:0] input
    CLE[1:0] input
    RE#[1:0] input
    WE#[1:0] input
    WP#[1:0] input
    RY/BY#[3:0] output

    支持两个8位数据接口或者一个16位数据接口
    最高速率达50Mbps

  3. Toggle NAND 1.0(Asynchronous DDR NAND Interface)
    performance and throughout
    Added DQS signals
    no clock
    DQS在上升或者下降沿进行数据传输,类似DDR的方式,提高数据传输率。
    最高速率达133Mbps

  4. ONFI NAND v2.0 interface
    增加时钟信号,支持异步接口保持向后兼容,也可以使用时钟信号支持同步接口
    最高速率达133Mbps

  5. Toggle NAND 2.0
    采用差分信号和ODT提高数据传输率和信号质量
    最高速率达400Mbps

  6. ONFINAND3.x和4.x接口
    采用差分信号和ODT提高数据传输率和信号质量
    最高速率达400Mbps

  7. SPI Nand Flash接口
    低功耗,接口简单

参考

  1. reference

host上编译安装qemu

1
2
3
./configure --target-list=aarch64-softmmu
make
make install

在编译qemu需要安装glibc和glib2的等开发包,请安装相应的开发包。

下载 UEFI firmware

我们需要支持aarch64的UEFI固件,上面的rpm在x86_64上无法直接安装,可以通过下面的命令获取UEFI固件。

  • 解压uefi固件
1
2
3
4
5
6
7
8
9
10
11
12
13
14
15
16
17
18
19
20
21
22
23
24
25
26
27
$ rpm2cpio edk2-aarch64-20190308git89910a39dcfd-6.el8.noarch.rpm | cpio -div 
$ tree usr
usr
└── share
├── AAVMF
│   ├── AAVMF_CODE.fd -> ../edk2/aarch64/QEMU_EFI-silent-pflash.raw
│   ├── AAVMF_CODE.verbose.fd -> ../edk2/aarch64/QEMU_EFI-pflash.raw
│   └── AAVMF_VARS.fd -> ../edk2/aarch64/vars-template-pflash.raw
├── edk2
│   └── aarch64
│   ├── QEMU_EFI.fd
│   ├── QEMU_EFI-pflash.raw
│   ├── QEMU_EFI.silent.fd
│   ├── QEMU_EFI-silent-pflash.raw
│   ├── QEMU_VARS.fd
│   └── vars-template-pflash.raw
├── licenses
│   └── edk2-aarch64
│   ├── License.edk2.txt
│   ├── LICENSE.openssl
│   └── License.txt
└── qemu
└── firmware
├── 60-edk2-aarch64.json
└── 70-edk2-aarch64-verbose.json

8 directories, 14 files

使用上面解压出来的UEFI固件:QEMU_EFI.fd

运行虚拟机 安装centos发行版

1
qemu-system-aarch64 -m 4096 -cpu cortex-a57 -smp 2 -M virt -bios QEMU_EFI.fd -nographic -drive if=none,file=CentOS-7-aarch64-Everything-1908.iso,id=cdrom,media=cdrom -device virtio-scsi-device -device scsi-cd,drive=cdrom -drive if=none,file=centos-aarch64.img,id=hd0 -device virtio-blk-device,drive=hd0
  • 上面的命令没有给VM配置网络接口,仅仅用来安装操作系统!!
  • centos的安装完全是基于命令行界面的,按照提示安装就可以了

配置网络

网络参照这个文档,配置tap接口给aarch64虚拟机使用。

  • 配置接口
    如果由brctl命令则使用brctl命令。

    1
    2
    3
    4
    5
    brctl addbr br0
    ifconfig br0 up
    tunctl -t tap0 -u root # 创建一个 tap0 接口,只允许 root 用户访问
    brctl addif br0 tap0 # 在虚拟网桥中增加一个 tap0 接口
    ifconfig tap0 0.0.0.0 promisc up # 启用 tap0 接口

    如果没有brctl命令,可以使用ip命令代替。

    1
    2
    3
    4
    5
    ip tuntap add tap0 mode tap
    ip link set dev tap0 up
    ip link add br0 type bridge
    ip link set tap0 master br0
    ip link set eth0 master br0
  • VM使用网络接口

    1
    -net nic -net tap,ifname=tap0,script=no,downscript=no

    使用上面的参数让qemu使用tap接口作为vm的网络接口。
    完整的命令如下:

    1
    qemu-system-aarch64 -m 4096 -cpu cortex-a57 -smp 4 -M virt -bios QEMU_EFI.fd -nographic -drive if=none,file=centos-aarch64.img,id=hd0 -device virtio-blk-device,drive=hd0 -drive if=none,file=CentOS-7-aarch64-Everything-1908.iso,id=cdrom,media=cdrom -device virtio-scsi-device -device scsi-cd,drive=cdrom -net nic -net tap,ifname=tap0,script=no,downscript=no

-boot c参数指定硬盘启动无效,原因不明,规避方法是启动中按esc进入UEFI的bootmgr选择硬盘启动。

配置ssh访问

登录aarch64 centos后,设置网络接口。这里VM使用的tap接口时桥接到外部网络的,配置地址后就可以访问。

总结

安装aarch64的centos后,登录发现虚拟机效率很低。

1
2
3
4
5
6
7
8
9
$ cat /proc/cpuinfo
processor : 0
BogoMIPS : 125.00
Features : fp asimd evtstrm aes pmull sha1 sha2 crc32 cpuid
CPU implementer : 0x41
CPU architecture: 8
CPU variant : 0x1
CPU part : 0xd07
CPU revision : 0

这里可见模拟cpu的BogoMIPS为125,即每秒125M指令,实际CPU的主频在250M左右。
host上cpu主频在2.2G,执行效率仅为10%,有着90%的性能损失。

参考

  1. Running VMs on Fedora/AArch64

  2. x86 平台安装arm虚拟机

问题

在linux 3.10.0上面,遇到一个udplite校验失败问题。

分析

udp报文格式:

1
MAC|IP|UDP|Payload

而如下的udplite报文被drop了。

1
2
3
4
5
6
7
8
9
MAC|IP|UDP|Payload
14 20 8 61

udplite_rcv
->__udp4_lib_rcv
->udp4_csum_init
->udplite_checksum_init
->skb_checksum_init_zero_check
~~~~~~~~~~~~~~~~~~~~~~~~~~~~ 报bad checksum

在udplite_checksum_init的开始处:

1
2
skb->len = 61 + 8 =69
udphdr->len = 64

UDPLITE协议中,udphdr中len表示对报文多少进行了校验。
即UDP_SKB_CB(skb)->partial_cov=1