问题
近期遇到松散源路由报文通信失败,通过systemtap可以很快定位报文丢弃在何处。
直接上探测脚本:
1 | probe begin() |
在报文路径上增加探测点直接定位出丢包位置。
分析
这个具体问题是在函数static inline bool ip_rcv_options(struct sk_buff *skb)中如果源路由未打开则直接drop。
打开内核中源路由选项,通信正常。
近期遇到松散源路由报文通信失败,通过systemtap可以很快定位报文丢弃在何处。
直接上探测脚本:
1 | probe begin() |
在报文路径上增加探测点直接定位出丢包位置。
这个具体问题是在函数static inline bool ip_rcv_options(struct sk_buff *skb)中如果源路由未打开则直接drop。
打开内核中源路由选项,通信正常。
在分析异常调用栈需要了解参数传递细节,在这里整理一下x86_64调用约定。
1 | .text |
上面是foo函数的汇编语句,在函数入口处,%rsp指向返回地址,重新设置%rbp指向当前栈帧。
1 | foo: |
如果在栈上分配局部变量,通过%rbp访问。-8(%rbp)访问第一个局部变量,依次类推访问其它局部变量。
1 | foo: |
在使用完局部变量需要把对应栈空间释放,平衡堆栈,最后ret返回caller处。
1 | call conventions: |
前6个参数使用寄存器传递,如果还有额外参数则通过堆栈传递。
以上式x86的调用约定,更正下x64的调用约定。
x64调用约定进行函数调用时栈必须是16字节对齐的,有人做过实验,只有macOS严格执行,
linux和windows似乎不严格执行该规定,即使不16字节对齐也没多大问题。
在windows上,x64调用约定使用rcx,rdx,r8,r9传参,但是需要在栈上给它们留空间,windows还有还有SEH结构化异常处理。
syzkaller是Google团队开发的一款针对Linux内核进行模糊测试的开源工具,目前还在不断的维护之中。
订阅了相关linux内核的邮件列表后,会收到google的sykaller发现的内核bug的相关报告。
1 | Hello, |
从上面的信息可以看出在rt_cache_valid中访问了已经释放的dst。rt_cache_valid函数在rcu读临界区内,
先检查下是否是rcu锁问题。rcu锁的作用是防止dst在有读者的时候被释放,而出问题代码本身位于读临界区,
此时dst的回收代码不会执行到。dst是正常引用计数到达0时被rcu softirq reclaim掉的。dst引用统计被put了
多次导致计数为0 被释放了。跟踪下sctp下dst的释放流程,sctp_transport_route先release dst再执行get_dst。
由于release dst不在rcu的读临界区,在dst引用计数为0导致dst被回收后,在执行get_dst流程时引用的dst早已
被rcu sofirq释放。最简单的修复把release dst也放到rcu读临界区,这样在release dst和get dst的时候不
会触发rcu softirq的reclaim动作。
OpenWrt是一个嵌入式的 Linux 发行版, 拥有强大的网络组件和扩展性,
常常被用于工控设备、电话、小型机器人、智能家居、路由器以及VOIP设备中。
很多采用openwrt的软路由的人更多的是使用openwrt的多拨实现带宽叠加。
其实openwrt多拨是基于内核的macvlan模块。
在macvlan之前,我们只能为一个物理网络接口添加多个ip地址,却不能添
加多个mac地址。macvlan可以在一个物理网络接口上虚拟出多个虚拟网络
接口,每个虚拟接口可以独立配置mac和ip地址。这样物理网络接口相当于
实现了一个交换机,记录了mac和虚拟接口的对应关系。
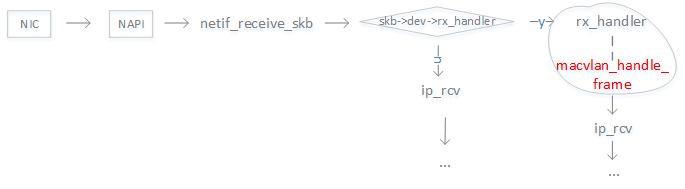
上图为内核的收包处理流程。内核为设置了macvlan的物理网络接口设置rx_handler函数,
在使用NAPI机制收到报文上送协议栈之前先执行macvlan_handle_frame。
macvlan_handle_frame函数根据二层头的目的mac地址判断是发给物理网络接口还是先发
给虚拟网络接口。设置skb->dev为macvlan设备,然后报文进入ip协议栈处理流程。
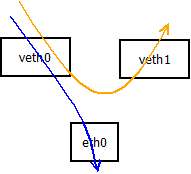
macvlan_queue_xmit是macvlan设备的发包函数,判断如果是桥模式则根据目的mac查找是否
是本机macvlan设备,如果是则直接发给本机macvlan设备执行netif_rx_internal。否则报文
通过底层设备发送出去。
有个macvlan,我们就可以基于虚拟网络接口进行pppoe拨号,从而获取多个wan连接,实现多拨。
看完编译器领域的”龙书”,有必要对某些关键点做下总结。符号表穿插在整个编译的过程,
无意是最重要的组成部分。
标识符的动态语义词典,贯穿编译的整个阶段,在编译的过程中不断更新。
类似人口大普查一样,把每个人信息都录入某个系统中,在需要时再查询。
名字
标识符,用作查询关键字
1 | int a; |
类型
该标识符的数据类型及其相关信息
1 | int a; |
a,b,c是整数类型,foo是函数类型。
种类
该标识符在源程序的语义角色
1 | int a;(1) |
(1)中a是变量
(2)中foo是函数,a和b是形参
(3)中c是变量
地址
与值单元相关的一些信息
一个源文件有若干函数组成,通常每个函数对应一个符号表,此外还有一个公共符号表。
符号表如何管理取决于所属语言的程序结构,常见的实现方式是在内存设定一定长度的
符号表区,并建立适当的索引机制,访问相应的符号表。
如下图所示: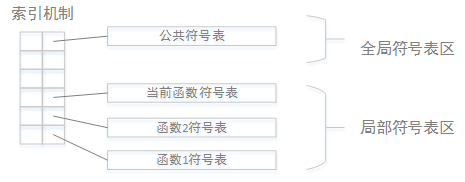
1 | int foo(int a,int b) |
需要填入符号表的标识符:
| 标识符 | 语义属性 |
|---|---|
| foo | 函数,附加信息:类型,参数情况和入口地址 |
| a | 形参 |
| b | 形参 |
| x | 变量 |
| y | 变量 |
| pi | 常量 |
由于标识符种类不同,导致语义属性不尽相同
下面是“龙书”中提到的一种符号表的体系结构: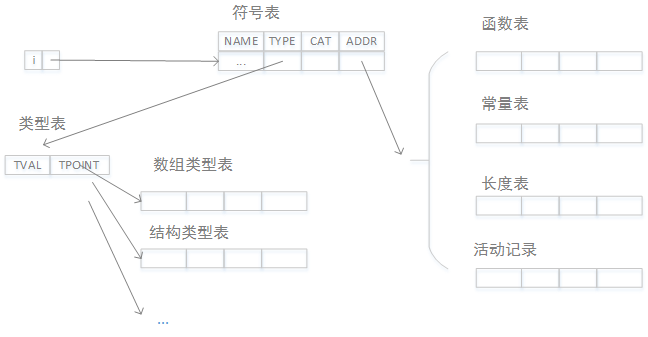
说明:
| 名字 | 说明 |
|---|---|
| NAME | 标识符源码,内部码 |
| TYPE | 指针,指向类型表的表项 |
| CAT | 种类编码:函数f,变量v,类型t,常量c,传值形参vf,传地址形参vn |
| ADDR | 指针,根据标识符种类不同,指向函数表,常量表等 |
| 名字 | 说明 |
|---|---|
| TVAL | 类型编码:整型,浮点型,字符型,布尔型,数组型,结构型 |
| TPOINT | 指针,根据类型编码的不同,指向不同的信息表项 基本类型:空 数组类型:指向数组表项 结构类型:指向结构表项 |
| 名字 | 说明 |
|---|---|
| LOW | 数组下届 |
| UP | 数组上届 |
| CTP | 成员类型指针,指向类型表中表项 |
| CTLEN | 成员类型长度,成员类型所占值单元长度 |
| 名字 | 说明 |
|---|---|
| OFF | 函数的值单元地址 |
| DAT | 指针,指向函数的数据区 |
| FN | 参数个数 |
| PAR | 指针,指向形参表 |
| ENT | 函数运行首地址,运行时填写 |
其它表
活动记录表
一个函数虚拟的值单元存储分配表,在函数运行调用时用到故称活动记录。
1 | int foo(int a,int b) |
该函数经过语法分析后,填充如下的信息:

最近在某发行版遇到问题,大体情况是修改/etc/default/grub的定制脚本,
在BIOS和UEFI主板的机器上结果不同,后调查发现在UEFI机器上,grub的配置文件
位于Efi System Paition分区,而不是BIOS机器上的/boot/grub2下。
这里分析下BIOS和UEFI启动。
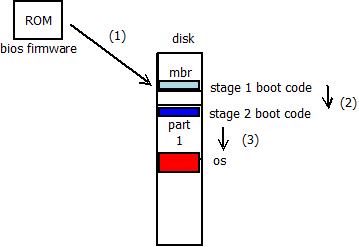
上电,bios firmware开始执行,加载MBR(第一扇区)到指定位置(0x7c00)开始执行第一阶段启动代码(bootcode)
第一阶段启动代码非常小,不超过1个扇区大小(扇区:512字节)
stage 1代码负责加载并执行stage 2的代码
stage 2代码(grub)功能强大,加载操作系统
stage 2加载操作系统,操作系统启动
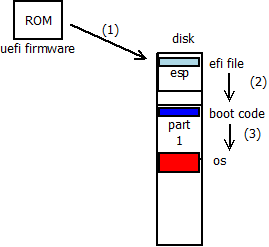
上电,uefi firmware开始执行,加载ESP分区的efi文件执行(解释执行efi byte code)
efi文件中是efi字节码,uefi固件内置efi解释器,用于执行这些代码
efi bootcode加载引导程序(grub)并执行引导程序
stage 2代码(grub)功能强大,加载操作系统
stage 2加载操作系统,操作系统启动
在系统启动上,除了1和2差别很大,后边系统启动完全一样了。
一直以来更多的是使用c语言,看到python语言在云计算时代广泛运用,
想着如何用c编写模块供python调用。python的官方实现就是c语言实现的,
即cpython。python提供了运行时接口供我们编写c扩展模块。
linux发行版通常把头文件和库文件打包成xxxx-dev的包形式。我们需要
安装python-dev来编写python扩展。
1 | #include <python.h> /* Python API to python runtime system */ |
如果模块名为xxx则必须提供xxxinit的函数。在python解释器加载模块的时候会寻找
模块动态库文件中导出的xxxinit函数。
gnome hangup after 49.7 days.
mutter是GNOME3的窗口管理器,用来取代Metacity。
[backends/x11: Fix time-comparison bug causing hang]https://gitlab.gnome.org/GNOME/mutter/-/merge_requests/12/diffs?commit_id=102abeedf4d3a804bed2e1930a93a52e4475a3bb
A comparison in translate_device_event() does not account for the fact
that X’s clock wraps about every 49.7 days. When triggered, this causes
an unresponsive GUI.
Replace simple less-than comparison with XSERVER_TIME_IS_BEFORE macro,
which accounts for the wrapping of X’s clock.
详细的提交记录
1 | commit 942883577ea700f0f419c335185891ff9a02e07b |
指针焦点被某个程序grab后,由于时间戳不对一直得不到释放。指针事件无法正确传递导致
桌面无响应。
1 | static void |
time是32位无符号整数,单位是ms,大约49.7天会溢出。在溢出后,导致事件的时间戳
被设置位很久之前的值,在提交给xserver时无效。
1 | /* Xserver time can wraparound, thus comparing two timestamps needs to take |
根据patch的修改,如果时间戳不对,则窗口不响应。
X服务器对时间戳的使用例子:
1 | time = ClientTimeToServerTime(ctime); |
这里先调用ClientTimeToServerTime把32位无符号转换为
TimeStamp类型,然后和currentTime进行比较。
1 | main |
mutter是基于glib的程序,通过事件源机制注册事件处理函数。
meta_backend_post_init中创建的事件源处理函数会调用XPending把窗口事件取出来,然后dispatch。
mutter作为窗口管理器会”收到”很多窗口的事件(实际也是通过xserver发过来,见substructure redirection),主要是窗口事件,这样mutter负责把窗口消息再发给
X服务器。
1 | /usr/include/X11/X.h:139: |
xserver如果使用client传递过来的timestamp
1 | ./dix/dixutils.c |
1 | ./dix/dispatch.c |
想知道linux发行版究竟是怎么启动安装的吗,下面简单的分析下dvd光盘启动linux机制。
如果系统支持DVD启动,CD/DVD镜像格式必须满足标准,目前主要是采用ISO 9660标准。
ISO 9660是CD-ROM的标准文件系统。它还广泛用于DVD和BD介质上,也可能存在于USB sticks或硬盘上。
ISO 9660基本信息:
BIOS/EFI固件支持CD/DVD启动,根据ISO 9660标准寻找光盘上的boot record记录,根据boot record进而找到boot image(isolinux.bin),
执行bootimage代码,根据isolinux.cfg的配置加载内核(vmlinuz)和RAM DISK(initrd),加载完后跳转到
内核执行。
这个initrd在内核启动时作为内存根文件系统使用,加载必要的驱动,然后内核切换到真正的根文件系统上面。
对于RHEL系就是光盘LiveOS下的squashfs.img。内核会挂载squashfs镜像,然后切换到其中的根文件系统。
1 | [root@vm]# file squashfs.img |
挂载该squashfs镜像后可得到里边是一个rootfs.img(ext4文件系统镜像)。
这个rootfs.img就是内核在安装发行版时使用的根文件系统。
vmlinuz是内核文件,如果是自己编译内核,可以到官网下载对应版本的
源码,编译。对于RHEL系发行版,一般有对应版本的源码包,如RPM源码包,安装后可以使用
rpmbuild编译内核。
对于debian系发行版,可以参考这里。
1 | [root@vm]# file vmlinuz |
1 | [root@vm]# file initrd.img |
一般initrd都是经过压缩的,如上是采用lzma压缩的。需要lzma解压,完成后得到cpio包。
1 | cpio -idmv <initrd.img |
经过cpio命令可以解压得到里边的内容。
1 | [root@vm]# ls |
这时可以对里边的内容修改,如替换成自己的内核驱动等等。
1 | find . | cpio -c -o ../initrd.img |
上面用于打包cpio,然后经过lzma压缩就可以得到可用的initrd。
这里注意如果使用自己的lib/modules/xxxx替换,需要depmod一下,生成
对应的modules.alias等文件,这样系统才能正常工作。
1 | depmod -a -b <lib/modules/xxxx中lib的父目录> -F <Your System.map文件> -E <Your symvers文件> <lib/modules/xxxx中的xxxx字符串即内核版本号> |
经过上述步骤后打包成的initrd是可以正常工作的。
1 | mkdir tmp_squashfs |
如果需要修改其中的rootfs.img需要拷贝出来,然后挂载该rootfs镜像,修改完直接卸载。
然后重新做成squashfs镜像。
1 | mksquashfs <Your squashfs目录> squashfs.img |
经过上述步骤可以详细了解linux发行版启动安装机制。
简单讲首先运行一个linux内核(CD/DVD上面),然后执行发行版的安装程序完成具体的安装。
安装程序负责对硬盘分区,挂载,使用CD/DVD上的目录作为安装源安装软件,最好配置重启完成安装。